
This article covers the “Configure azure files” section of the AZ-100 and AZ-103 Exams and is part of my AZ-100 Study Notes series.
Create Azure file share
It is possible to create an Azure hosted file share which may be connected to via Windows, Linux etc.
To create a file share –
- Navigate to the Storage Account to use.
- Select ‘Files’ in the ‘File Service’ menu.
- Click ‘Add File Share’.
- Provide a name and a storage Quota.
- Click ‘Create’.
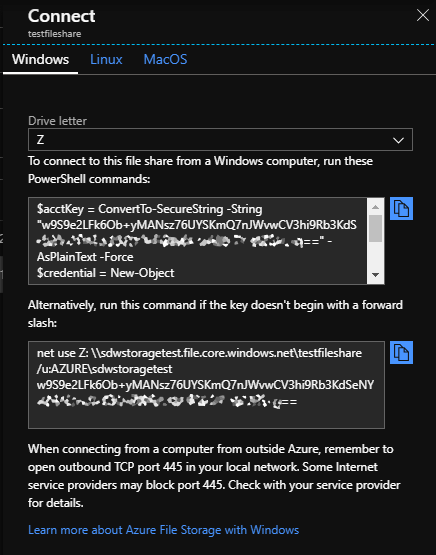
Once setup, you may connect to the File Shares easily by selecting ‘Connect’ in the context menu of the new file share which will bring up various commands that create a file share on a physical machine.
More information can be found at – https://docs.microsoft.com/en-us/azure/storage/files/storage-how-to-create-file-share
Create Azure File Sync service
The Azure File Sync service allows you to deploy local cache copies of Azure Storage Accounts to Windows Server which allows you to benefit from quick access times with the safety of an Azure storage Account behind it.
There are several prerequisites to using Azure File Sync –
- An Azure Storage Account
- Configured File Share on Storage Account
- Storage Account must be in the same region as the File Sync will run
- A Windows Server system
- PowerShell 5.1+
- The AzureRM PowerShell Module
- Disabled IE Enhanced Security
The File Sync Service can be easily deployed on the server using the various scripts found here – https://docs.microsoft.com/en-us/azure/storage/files/storage-sync-files-deployment-guide?tabs=azure-powershell
You can configure the Service Sync service by navigating to a Resource Group and selecting ‘Add’ then doing a search for ‘Azure File Sync’ and selecting the resource published by Microsoft. You then provide a ‘Name’ and select a Subscription and Resource group.
More information can be found at – https://docs.microsoft.com/en-us/azure/storage/files/storage-sync-files-deployment-guide?tabs=azure-portal
Create Azure sync group
Sync groups are created by navigating to a ‘Storage Sync Service’ and selecting ‘Add Sync Group’ in the Overview. You then define a group name and select the Subscription and storage account to connect to and click ‘OK’.
Once that’s done you can continue configuring the Azure File Sync on the Windows server by selecting the newly created group.
We then need to configure the server endpoint in Azure by navigating to the Sync group and clicking ‘Add server endpoint’ at which point we can choose the Windows Server we connected and specify the path that we will sync the data to.
Cloud Tiering allows you to automatically sync only the most recently accessed files to the Windows server and Offline Data Transfer allows you to configure services such as an Azure Storage Box for transferring the data.
Once ‘Create’ is clicked on the ‘Add server endpoint’ files will start to sync between the Azure Storage Account and the local copy on the server. This link syncs both ways.
More information can be found at – https://docs.microsoft.com/en-us/azure/storage/files/storage-sync-files-deployment-guide?tabs=azure-portal
Troubleshoot Azure File Sync
I’ll link to the documentation for this as it’s largely situational, however worth mentioning that in almost no cases should the endpoint be removed and re-added to troubleshoot issues as it can lead to various issues with file sync and may be destructive.
Azure File Sync troubleshooting – https://docs.microsoft.com/en-us/azure/storage/files/storage-sync-files-troubleshoot?tabs=portal1%2Cazure-portal


Leave a comment