
This article covers the “Implement Azure backup” section of the AZ-100 and AZ-103 Exams and is part of my AZ-100 Study Notes series.
Create Recovery Services Vault
The Recovery Services Vault is a storage entity in Azure that stores backups of various Azure resources such as VMs, SQL databases, files etc. It allows for automatic backups to Azure and On-Premise servers and also allows for easy restore of backed up resources.
The Recovery Services Vault can be created by selecting “Create a resource” and then searching for “Backup and Site Recovery (OMS)”. You then provide a name, select the relevant Subscription and Resource group and then select a primary location to host it.
It is possible by clicking ‘Add Backup’ to configure backups via Azure, Azure Stack or an On-Premise instance. You then select the Backup policy to enforce and the resources to back up and create the backup job.
More information can be found at – https://docs.microsoft.com/en-us/azure/backup/backup-azure-recovery-services-vault-overview
Configure and review backup reports
Once a Recovery Services Vault has been created it is possible to configure Backup Reports which allows you to connect Power BI to Azure and retrieve various information about backups.
Before we can setup any form of reporting we first need to configure diagnostics by selecting “Diagnostic settings” in the “Monitoring” menu and then clicking “Turn on Diagnostics”. From here you then need to optionally choose whether to “Archive to a storage account”, “Stream to an event hub” or “Send to Log Analytics” each of which opens a context sensitive menu to configure each of the options.
Diagnostics must be configured to archive to a storage account for them to be accessible to us.
Once diagnostics have been configured and a 24-hour period has passed in order for the data to be saved to the Storage Account it is possible for us to perform reports on the data by signing into the PowerBI platform and selecting “Get Data” found at the bottom left and then selecting “Services” then searching for and selecting “Azure Backup”.
Finally, enter the name of the Storage Account and finally provide authentication for the connection.
At this point we may access pre-configured Dashboards or Reports or create our own using the data from the Storage Account.

More information can be found at – https://docs.microsoft.com/en-us/azure/backup/backup-azure-configure-reports
Perform backup operation
Once a “Recovery Services Vault” is set up and an applicable backup policy is configured a manual backup of an Azure virtual machine can be easily performed by navigating to the VM in the portal and selecting “Backup” in the “Operations” menu. From here you can click “Backup now” and select the retention date at which point a quick single backup is performed.
The backup process through the Overview is fairly straightforward and allows you to configure automated backups consisting of a backup schedule covering days, weeks, months and years for various Azure resources.
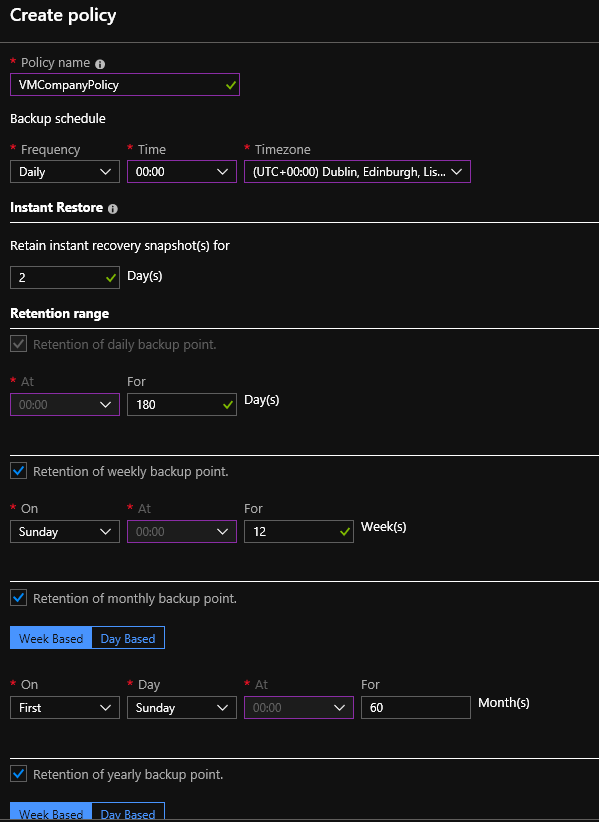
Create and configure backup policy
Backup Policies may be configured by selecting “Create New” whilst creating a Backup in the Recovery Vault or by navigating to the Recovery Vault and selecting “Backup policies” in the “Manage” menu.
Polices are broken down into three types, “Azure Virtual Machines”, “Azure File Share”, and “SQL Server in Azure VM”.
The available parameters for the various policies do vary greatly dependent on the type selected, if “Azure Virtual Machine” is selected then Azure allows you to configure the Backup schedule including the frequency and time, the Instant Restore which is a snapshot of a vm that allows for quicker recovery and a retention range for backups including daily, weekly, monthly and yearly.
More information on this can be found at – https://docs.microsoft.com/en-us/azure/backup/tutorial-backup-vm-at-scale#set-backup-policy-to-protect-vms
Perform a restore operation
A restore operation on a VM may be performed by navigating to a Recovery Services vault and navigating to “Backup items” in the “Protected items” menu. From here select “Azure Virtual Machine” and then select the ellipses menu of the VM to restore followed by “Restore VM”.
It is also possible to do this by navigating to the VM itself and then selecting “Backup” in the “Operations” menu and selecting “Restore VM”.
At this point you must select a restore point and then finally configure the new Virtual Machine or select an existing VM to replace.

It is also possible to configure a File Recovery volume which may be mounted to a physical or virtual machine with the use of a script that Microsoft provides. This is possible by selecting “File Recovery” rather than “Restore VM” in the ellipses menu of a VM in the Recovery Vault.
More information on this may be found at – https://docs.microsoft.com/en-us/azure/backup/backup-azure-arm-restore-vms


Leave a comment