
This article covers the “Import and export data to Azure” section of the AZ-100 and AZ-103 Exam and is part of my AZ-100 Study Notes series.
Import/Export Jobs are basically the act of sending or receiving physical drives to/from Microsoft for upload or export of data to and from Azure. This can be useful for processing of a large amount of data whereby it may be impossible to do it through a simple network upload due to concerns around bandwidth.
Import/Export Jobs
Command Line Tool
- Preparing disk drives before shipping
- Copying data to drive
- encrypt data with BitLocker
- generate drive journal files
- determin number of drives
Send drives containing data or export where you receive empty disks
Create export from Azure job
Export Jobs may be started by navigating to ‘Import/Export Jobs’ in All Services and then selecting ‘Add’ in the ribbon. You then select the ‘Type of action’ to start, for this we’ll select ‘Export from Azure’ and define what Subscription and Resource group to perform the action on.
You then configure the Data source that we want to export from Azure. This is done by selecting the Storage Account we want to export and selecting what blobs to export from the following options –
- Export all – exports all contents of the storage account
- Selected containers and blobs – allows you to select specific containers or blobs and filter based on prefixes (directories)
- Export from blob list file (XML format) – allows you to select a pre-created XML file containing blob names and blob prefixes (this shows an example in the ‘Example of PreviewExport command section’)
You then define ‘Return shipping info’ which requires at minimum the Carrier name and account number and address details including a specified email and phone number.
Once done you will be taken to a summary page showing all the details you entered and it will provide details for where to ship your drives.

More information on this can be found at – https://docs.microsoft.com/en-us/azure/storage/common/storage-import-export-data-from-blobs
Create import into Azure job
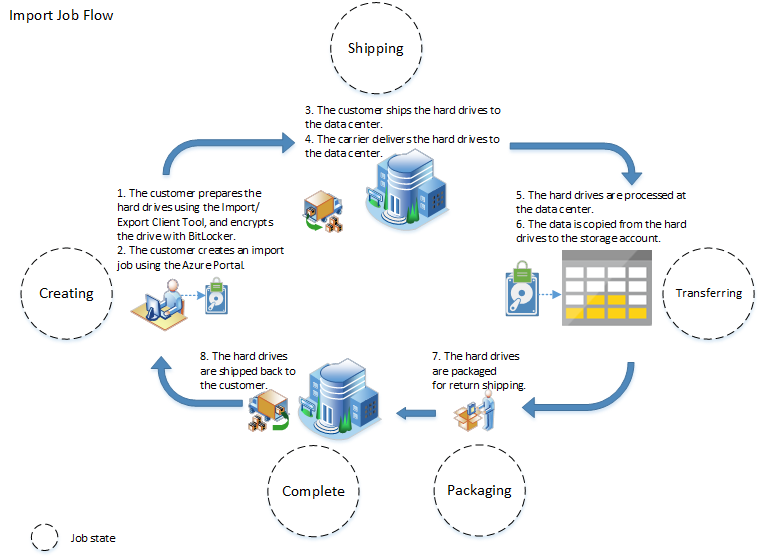
The import process is done in a similar manner to the Export job shown above, however before importing at all any drives must be encrypted with BitLocker and a Journal file must also be uploaded which is generated using the Azure Import/Export Tool.
The entire process is shown in the image below from the Microsoft documentation –
More information on this can be found at – https://docs.microsoft.com/en-us/azure/storage/common/storage-import-export-service
Use Azure Data Box
Azure Data Box is designed to enable transfer of large amounts of data into Azure in a quick and inexpensive manner, where network connectivity may be limited. The concept is similar to Import/Export jobs however they send a dedicated device rather than just a single disk.
The overall steps are –
- Order your preferred Data Box Model.
- Receive the device.
- Copy data onto it.
- Return the device to Azure.
To start an Azure Data Box job –
- Click ‘Create a resource’
- Do a search for ‘Azure Data Box’ then select ‘Azure Data Box’ and then finally click ‘Create’.
- Then select a Subscription, source country and the destination azure region.
- Click Apply.
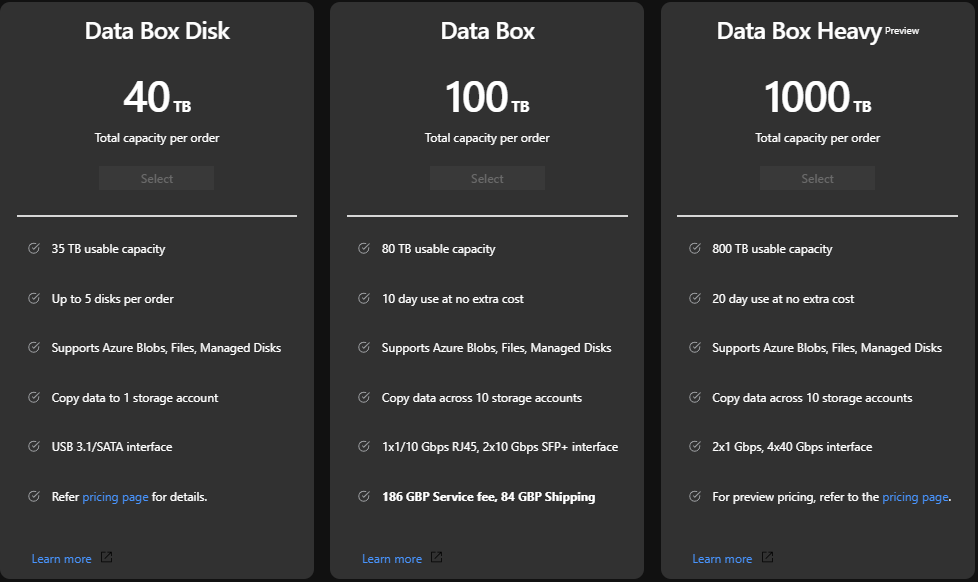
- Next, select the type of data box to use, currently these range from 40TB – 1000TB capacity.
- Enter the order and shipping info.
- Review the summary.
- Click OK to confirm the order.
There’s quite a bit of info on this that’s worth reading – https://docs.microsoft.com/en-us/azure/databox/data-box-quickstart-portal
Configure Azure content delivery network (CDN) endpoints
The Azure CDN is a distributed network of servers across the globe which allow for minimal latency for file requests thanks to the data being closer to the requester in most cases.
The benefits to utilizing the CDN are –
- Scaling to handle temporary load peaks.
- Better performance thanks to distributed files.
There are 4 separate offerings from Microsoft, Akamai and Verizon. The features included in these do differ with Akamai for example being the only CDN to provide dynamics image compression and Premium Verizon being the only one to allow URL redirect/rewrites. For a full list of functionality look here – https://docs.microsoft.com/en-us/azure/cdn/cdn-features
Akamai is very focused around media and providing it in an efficient manner, whereas Verizon focuses more on the content and customization around it’s delivery to users. Microsofts offering provides no unique functionality other than the ability to provide your own SSL certificate.
Configuring a CDN
For the purposes of testing the CDN I’ve created a storage account located in East Australia and I’ll upload a fairly large 4k and 8k image.
To create a new CDN you can do the following –
- Navigate to ‘Create a resource’ and then either select ‘Web + Mobile’ or do a search for ‘CDN’.
- Click ‘Create’ which will take you to the CDN Profile page.
- Enter a name for the CDN, then select a Subscription and Resource Group that you want to provide via the CDN.
- Select a ‘Pricing tier’ which is described above and which allows you to choose between Microsoft, Akamai and Verizon.
- Then choose create to kick off the creation of the CDN.
- It will take a little while to get set up.
Once the CDN is created, we’ll need to add at least a single endpoint which will configure how we can access a storage account behind the CDN –
- Navigate to the CDN.
- In the Overview page click ‘Add an Endpoint’.
- Give the endpoint a ‘Name’.
- Select a ‘Origin Type’ which will decide the type of resource to connect to.
- Select an ‘Origin Hostname’ or similar if you’ve not chosen Storage as the origin type. This chooses the resource to connect to.
- Enter an ‘Origin Path’ which allows you to link directly to a directory within a Storage Account.
- Select whether to make it available via HTTP and/or HTTPS and over what ports.
- Select ‘Optimized for’ which allows you to optimize for large files types etc. The values available here depend on the type of CDN selected.
- Click Add to start the setup for the Endpoint.
I uploaded an 8k resolution image to a storage account in Australia East, which gave me a download time of 15.26 seconds in total with the same file taking 10.32 seconds once it was cached via the CDN.
More info on this can be found at – https://docs.microsoft.com/en-us/azure/cdn/cdn-overview


Leave a comment