
This’ll be a rather technical short article on how to properly connect a Raspberry PI 4 to an NRF51822 Nordic Semiconductor SoC chip. The NRF51822 is a very small low energy Bluetooth chip that I’ll be using in my Honours project as a gateway between a Bluetooth Low Energy device and a ESP8266 WiFi chip with the overall goal being to create a smart tracker platform.
Physical Connections
I would suggest connecting the NRF51822 chip to the Raspberry PI using Dupont connectors as this allows for easily plugging and unplugging the various connections we’ll need. The following pins needs to be connected to allow flashing the chip from the Raspberry PI.
| NRF51822 | Raspberry PI 4 |
|---|---|
| GND (Ground) | GND Pin 6 |
| VDD (Power) | 3.3V Pin 1 |
| SCLK/SWCLK (Input) | GPIO 25 Pin 22 |
| SDD/SWDIO (Output) | GPIO 24 Pin 18 |
OpenOCD Setup
Install OpenOCD
First we need to install the latest OpenOCD repository, to do this use the following commands –
sudo apt-get install git autoconf libtool make pkg-config telnet libusb-1.0-0-dev libusb-1.0-0
git clone git://git.code.sf.net/p/openocd/code openocd
cd openocd/
./bootstrap
./configure --enable-sysfsgpio --enable-bcm2835gpio
make
sudo make install
Once this is done we then need to set up a proper interface config file that will work for the Raspberry PI 4, you’ll need to first make a copy of one of the original config files and then modify it as required.
Creating a new Raspberry Pi 4 Interface Config
- Open the console.
- Type “cd /usr/local/share/openocd/scripts/interface” to navigate to the interfaces directory.
- Then type “sudo cp raspberrypi2-native.cfg raspberrypi4-native.cfg” which will copy the original PI 2 config file which we’ll use as a base.
- Finally type “sudo nano raspberrypi4-native.cfg” to open the new config file in a text editor.
You will then need to modify the file so that it is identical to the example below –
#
# Config for using Raspberry Pi 4's  expansion header
#
# This is best used with a fast enough buffer but also
# is suitable for direct connection if the target voltage
# matches RPi's 3.3V and the cable is short enough.
#
# Do not forget the GND connection, pin 6 of the expansion header.
#

adapter driver bcm2835gpio

bcm2835gpio_peripheral_base 0xFE000000

# Transition delay calculation: SPEED_COEFF/khz - SPEED_OFFSET
# These depend on system clock, calibrated for stock 1000MHz
# bcm2835gpio_speed SPEED_COEFF SPEED_OFFSET
bcm2835gpio_speed_coeffs 236181 60

# Each of the SWD lines need a gpio number set: swclk swdio
bcm2835gpio_swd_nums 25 24
Once this is done you should be able to start OpenOCD and create a connection to the device.
Start OpenOCD and Connect
To start OpenOCD, run the following command –
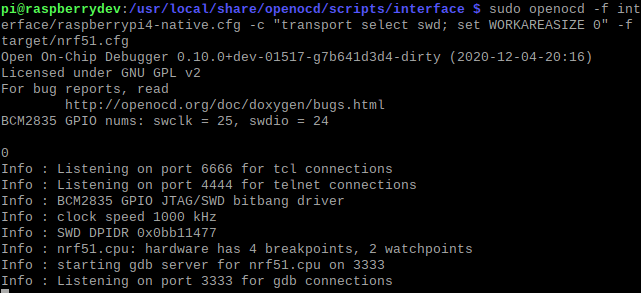
sudo openocd -f interface/raspberrypi4-native.cfg -c "transport select swd; set WORKAREASIZE 0" -f target/nrf51.cfg
If everything has been set up correctly you should see the same result as in the image below.
In a separate console, create a telnet session to 127.0.0.1 on port 4444 to connect to the NRF51 chip.
From here you can then run commands directly on the device, including flashing new images.


Leave a comment