
This article covers the “Create and configure storage accounts” section of the AZ-100 and AZ-103 Exams and is part of my AZ-100 Study Notes series.
Configure network access to the storage account
Network Access to storage accounts may be managed in the following manner –
- Navigate to the resource group
- Select ‘Firewalls and virtual networks’ in the Settings menu.
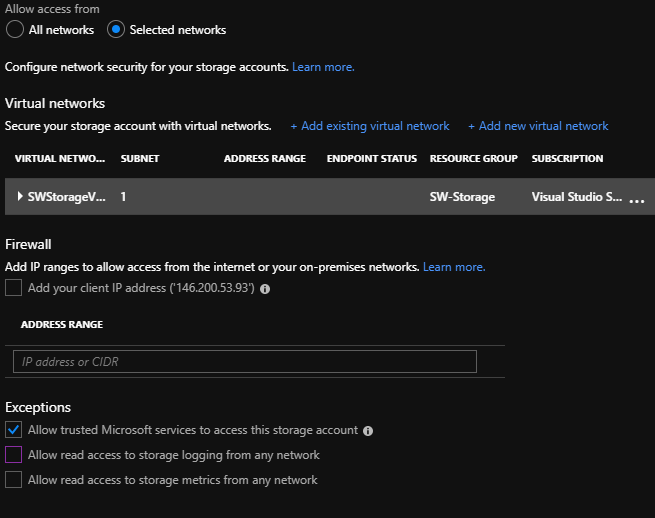
- Choose the ‘Allow access from’ field from either ‘All networks’ which allows traffic from anywhere or ‘Selected networks’ which allows you to configure Virtual networks, Firewalls and exceptions.
- Click Save to apply changes.
Access may be restricted considerably using an Azure Virtual Network and a Firewall which only allows connections from specific IP’s.
Exceptions to rules may also be configured from the following options –
- Allow trusted Microsoft services to access this storage account
- Allows some Microsoft services which can’t be granted access through the rules access to the storage account, More info on specific services at link below.
- Allow read access to storage logging from any network
- Allow read access to storage metrics from any network
More information can be found at – https://docs.microsoft.com/en-gb/azure/storage/common/storage-network-security
Create and configure storage account
Storage Accounts are used to store data within Azure in the form of Blobs, Files, Tables and Queues. Blobs are a store for unstructured data such as text or binary data.
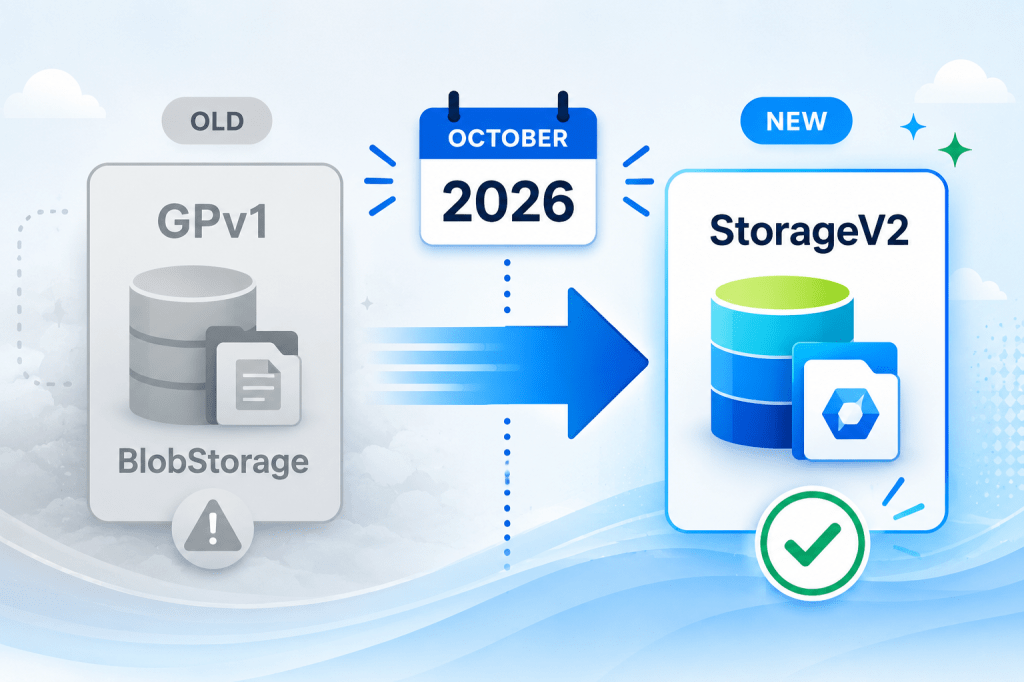
There are 3 types of storage accounts, General Purpose v1 (GPV1), Blob Account and General Purpose v2 (GPV2). GPV2 is the latest standard and incorporates the features of the previous two.
To create a storage account –
- Go to either ‘Create a resource’ or select ‘Add’ on an individual resource.
- Do a search for ‘Storage Account’ and select the result.
- On the ‘Create storage account’ page you select the Subscription and the resource group the storage account will be part of.
- Enter a new name for the storage account and select a location.
- Choose the Performance type from either Standard or Premium.
- Standard utilizes HDD’s and is the cheapest form of storage.
- Premium uses SSD’s and may only be used for virtual machines.
- Choose an ‘Account kind’ –
- StorageV2 is the latest storage version and allows implementation of all functionality found in V1.
- StorageV1 is legacy and replaced by V2.
- Blob storage is mostly for unstructured data, replaced by StorageV2 for most situations.
- Choose a Replication strategy –
- LRS – locally redundant storage, 3 copies in the same data center
- ZRS – same as above but in 3 separate data centers in same regions
- GRS – 6 copies across multiple regions
- RA-GRS – Replicate between regions in a readable format
- Finally, select an Access tier –
- Cool is for data that’s not accessed regularly, lowest storage cost but high access costs.
- Hot is for regularly accessed data, highest storage cost, and lowest access cost.
- Click ‘Review + Create’ then click ‘Create’ to create the storage account.

It is possible to upgrade a storage account by navigating to the ‘Configuration’ page and selecting ‘Upgrade’ which is only available if you’re not using ‘StorageV2’ already.
From the ‘Configuration’ page you can also modify the Performance mode, whether HTTPS is required to connect, the Access tier, Replication mode, whether to allow access via AAD authentication.
More data can be found at – https://docs.microsoft.com/en-us/azure/storage/common/storage-introduction
Generate shared access signature
Shared Access Signatures are URI’s that grant restricted access to Azure storage resources. They are provided to provide delegated access to third parties who should not have access to the Storage Account itself.
SAS’s are time limited with a start and expiration date specified as part of the URI.
SAS can be created by doing the following –
- Navigate to the Storage Account.
- Select ‘Shared access signature’.
- Choose the ‘Allowed services’, ‘Allowed resource types’ and ‘Allowed permissions’ which controls the containers, resources and actual permissions such as Read, Write, Delete etc.
- Define a Start and End Date that the SAS will provide access for, the URI may not be used before or after these dates.
- Optionally also define a range of IP’s to allow access to.
- Select the allows protocols from ‘HTTPS only’ and ‘HTTPS and HTTP’.
- Select the ‘Signing key’ to use.
- Click ‘Generate SAS and connection string’ to generate the URI.
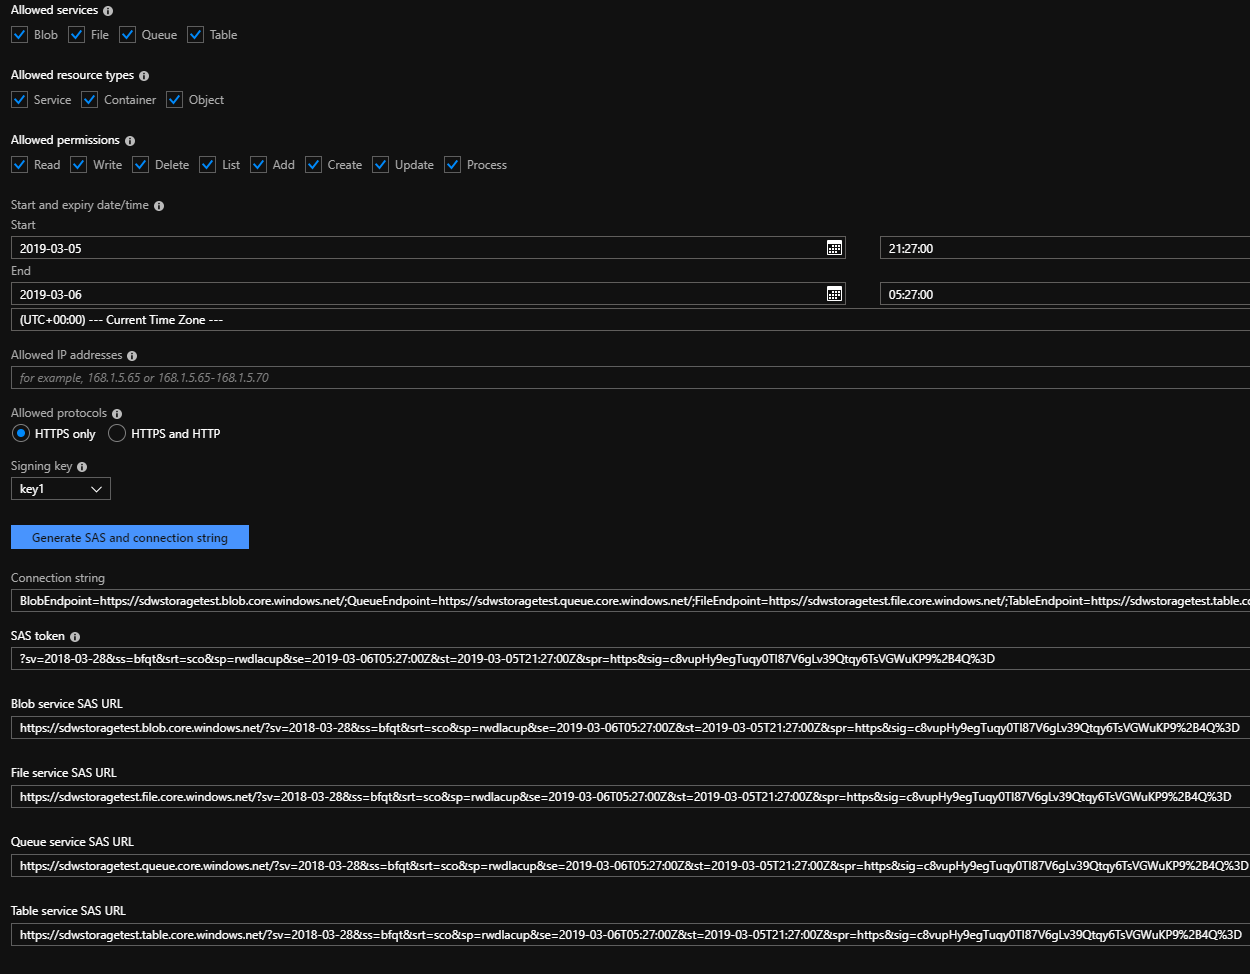
An example of a generated URI is as follows –
https://sdwstoragetest.file.core.windows.net/?sv=2018-03-28&ss=bfqt&srt=sco&sp=rwdlacup&se=2019-03-06T05:27:00Z&st=2019-03-05T21:27:00Z&
spr=https
&sig=c8vupHy9egTuqy0TI87V6gLv39Qtqy6TsVGWuKP9%2B4Q%3D
The link above can be broken down into it’s constituent parts as follows (Bold above) –
- https://sdwstoragetest.file.core.windows.net
- The URI to the individual storage account
- sv
- The Storage service version – the version of the SAS query to use
- ss
- Signed Services – the type of resources to allow access to, Eg. b = Blog
- srt
- Signed Resource Types – the services to allow access to, Eg. c = Container
- sp
- Signed Permissions – the permissions to allow, Eg. r = Read, D = delete
- se / st
- Signed Expiry and Start – the times to allow access between
- spr
- Signed Protocol – The protocol to use to connect, Eg. https = HTTPS only
- sign
- Signature – Used to authenticate the request, unique access key
More information can be found at – https://docs.microsoft.com/en-us/azure/storage/common/storage-dotnet-shared-access-signature-part-1
Install and use Azure Storage Explorer
Azure Storage Explorer is used to view and manage the contents of storage accounts on Windows, Mac, and Linux machines and can be downloaded via – https://azure.microsoft.com/en-gb/features/storage-explorer/
When Azure Storage Explorer is installed you will be prompted to connect to an Azure Storage account. This can be done via several methods –
- Add an Azure Account – Sign in using AAD authentication and navigating.
- Use a connection string – Uses a connection string to connect to the account
- Use a shared access signature URI – Uses a Shared Access Signature as discussed above
- Use a storage account name and key – Uses a key defines in ‘Access Keys’
- Attach to a local emulator – Connects to a local instance of an Azure storage account
It is also possible to access individual storage accounts by navigating to the account in the Azure Portal, navigating to the Overview page and selecting ‘Open in Explorer’.
Once connected (using ‘Add an Azure Account’), you then select the subscriptions to view. When a subscription is selected you can then view any storage accounts and any blobs, file share, queues and tables in the account.
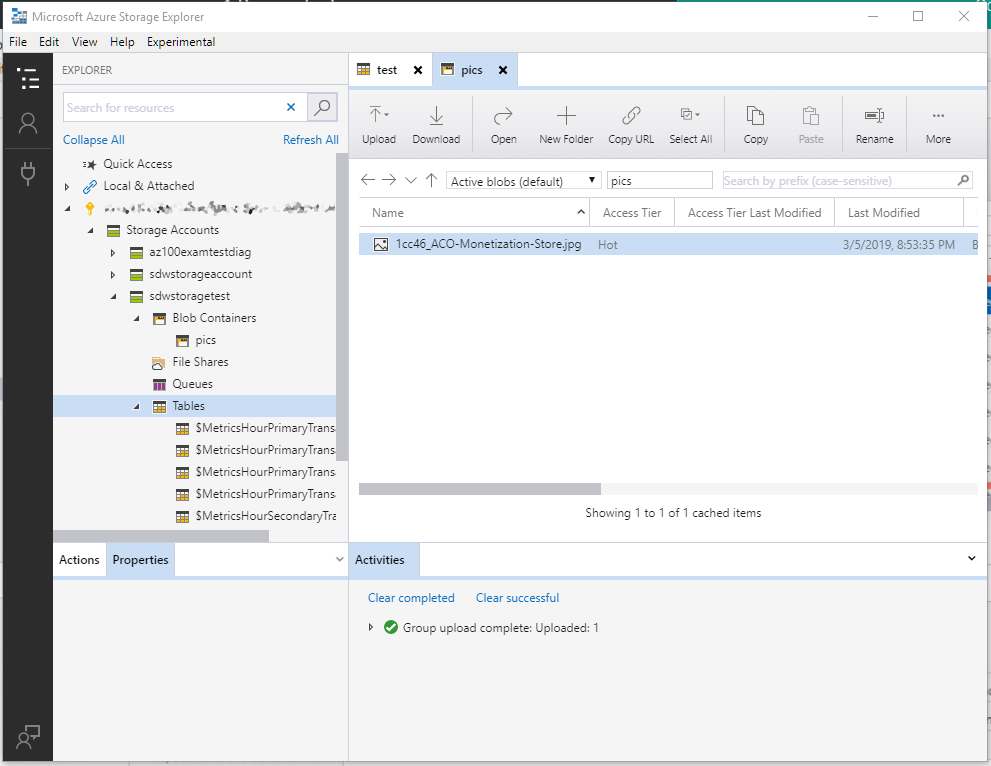
From here you can right click any of the types of records and create new records such as File Shares. The image above shows a view of the File Shares type with a newly uploaded image file.
More information can be found at – https://docs.microsoft.com/en-us/azure/vs-azure-tools-storage-manage-with-storage-explorer
Manage access keys
There are 2 access keys per Storage Account which may be regenerated at any time, the reason behind this is so that when 1 key is regenerated the other can be configured in any apps using the keys.
Keys are managed by navigating to the Resource Group and then selecting ‘Access keys’, there isn’t much management of the keys from within Azure.
Microsoft recommend that these be regenerated regularly.
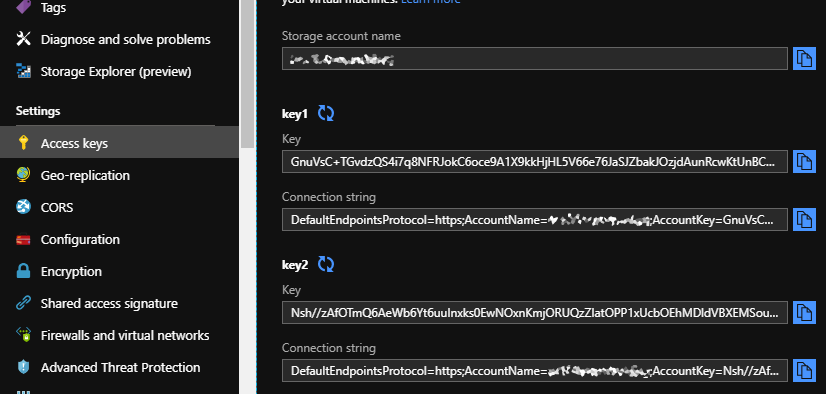
Keys are the equivalent to root access and so should be guarded and regenerated if you believe they’ve been leaked.
More information can be found at – https://docs.microsoft.com/en-us/azure/storage/common/storage-account-manage
Monitor activity log by using Log Analytics
The Activity Log for storage accounts can be easily configured by navigating to the ‘Activity Log’ page within a Storage Account and then clicking ‘Logs’ then ‘Add’.
Then select the Log Analytics Workspace to connect to and click OK.L
Logs are then viewable by selecting the Azure Activity Log which then displays various details as in the image below.
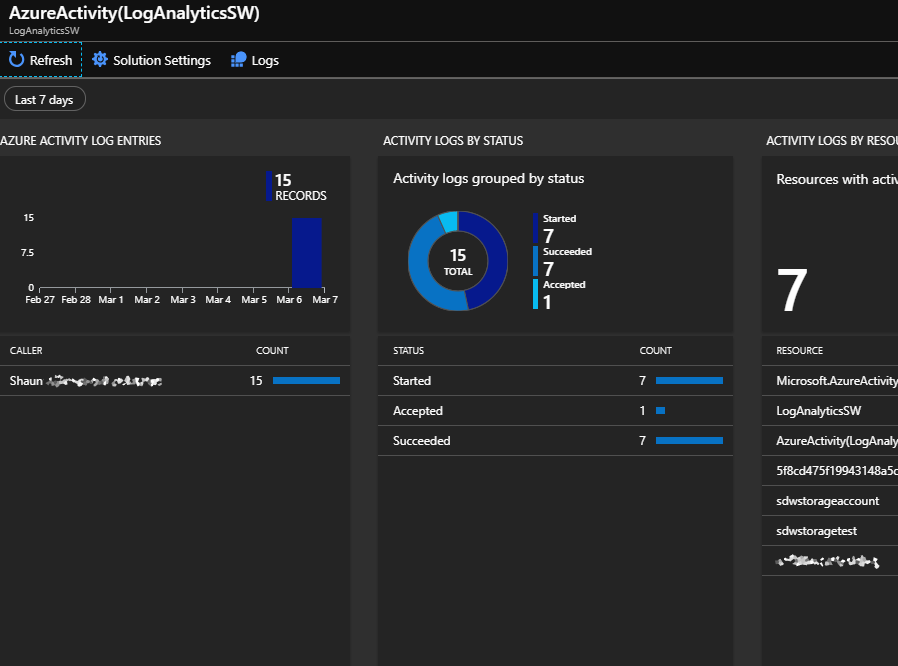
Logs may be queried using Log Space Analytics by selecting the Logs button displayed in the ribbon in the image above.
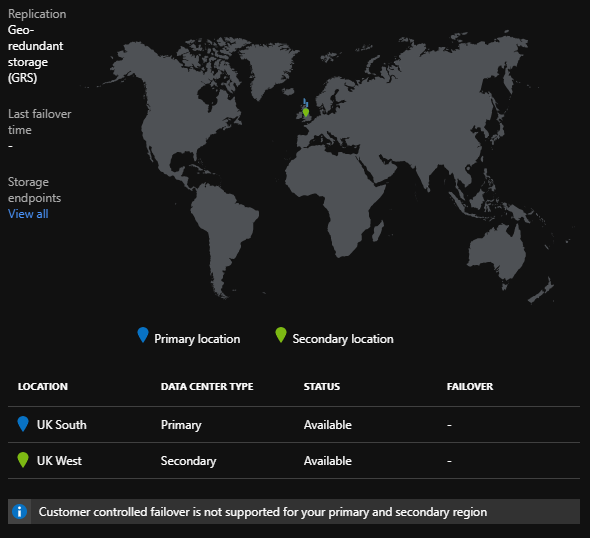
Implement Azure storage replication
It is possible to configure the type of storage replication when first creating a new storage account by choosing the replication method which I’ve covered earlier in the “Create and configure storage account” section.
Log-redundant storage (LRS) replicates a given storage account to more than 1 rack in a single data center, this is the cheapest form of replication but doesn’t cover against a potential data center scale disaster. This may be the best option when there are concerns around the country data is hosted in as data is only hosted in the chosen country.
Zone-redundant storage (ZRS) replicates data synchronously between three storage clusters in a single region. This ensures high availability even in the event of a single data center failure for any reason.
Geo-redundant storage (GRS) replicates data across two regions, with both regions being 100’s of miles apart. This provides availability even in the event of a region wide disaster. GRS only allows reading of the data in the secondary region when they initiate a failover to it.
Read-access geo-redundant storage (RA-GRS) replicates data in the same manner as GRS but allows for reading of the primary or secondary region data at any time.
More information can be found on this at – https://docs.microsoft.com/en-gb/azure/storage/common/storage-redundancy


Leave a comment