
This article covers the “Manage Resource Groups” section of the AZ-100 and AZ-103 Exams and is part of my AZ-100 Study Notes series.
Use Azure policies for resource groups
Azure policies are a tool to enforce governance and allow organisations to apply various restrictions or effects on resources.
They may be assigned to either Subscriptions as a whole which will roll down to all resources within or to Resource Groups.
Creating Policies
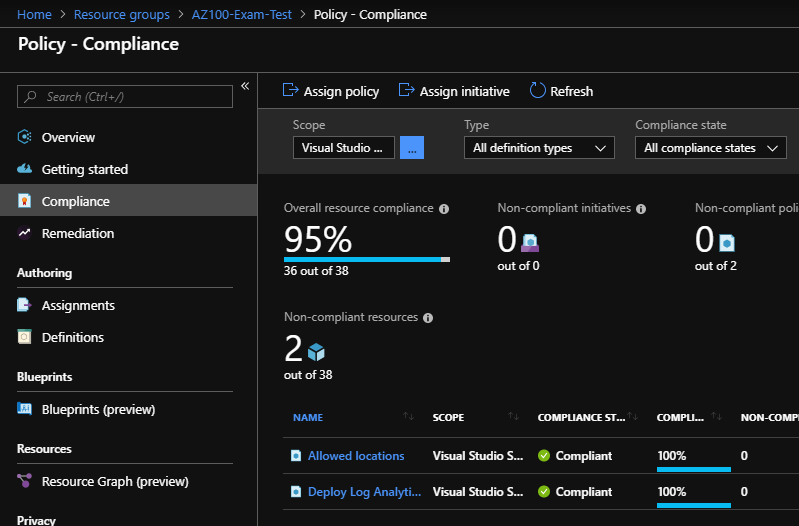
Policies may be configured by navigating to a resource group and then selecting the ‘Policies’ menu item which will take you to the ‘Policy – Compliance’ page.
From here click the ‘Assign Policy’ button which will open the Assign Policy page which will allow you to create policies.
When creating a policy, you first select the scope of the policy which specifies where the policy will apply, to do this you first select a Subscription and then a Resource Group within that Subscription. You can then optionally define exceptions to the policy.
You then select a specific policy definition template to apply, there are 148 preconfigured templates supplied by Microsoft, however, more can be created using custom code as required.
In this case, I’ll configure an ‘Allowed locations for resource groups’ policy which will enforce a requirement that resources are created in a specific location.
Once you select a policy template, the remaining fields of the form will change depending on what is required by the policies, in the case of the resource location policy we will need to choose ‘Allowed locations’. For policies which automatically create resources, you must also create a ‘Managed Identity’ which is an identity with the permission to deploy resources.
Once we click Apply the new policy will roll out instantly with the compliance state set to ‘Not Started’ which indicates that the policy is yet to analyze all applicable resources for their compliance. Once resources are analyzed the status changed to ‘Compliant’ or ‘Not Compliant’.
Further information can be found at – https://docs.microsoft.com/en-us/azure/governance/policy/overview
Configure resource locks
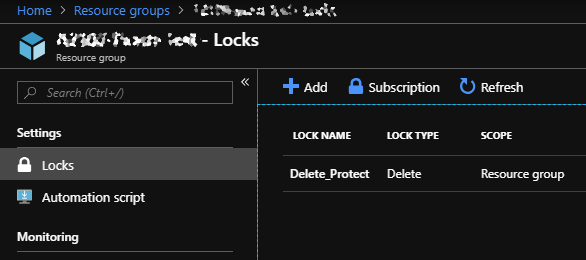
Resource Locks are used to lock down resource groups or resources from deletion or editing. They can enforce two levels of protection, “Delete” which means that resources may not be deleted until the resource lock has been removed and “Read-only” which means that users may only read a resource, but cannot update or delete that resource.
Resource Locks may be created at the Resource Group level which will protect the group itself as well as all resources within that group. At this level, they may be configured by navigating to the group then selecting ‘Locks’ in the menu. However, Locks may also be created at the individual resource level which will then only apply to that resource.
Create a Resource Lock
Create a lock by navigating to the Locks menu item and then defining a name, choosing a protection to enforce and optionally defining a note and then clicking OK.
Further information can be found at – https://docs.microsoft.com/en-us/azure/azure-resource-manager/resource-group-lock-resources
Configure resource policies
This is largely covered in the first section.
Worth noting that policies defined at the Resource Group level roll down to all resources within that group and are also visible at that resources ‘Policies’ page. You can define unique policies on the resources themselves though.
Implement and set tagging on resource groups
Tagging is a very cool concept, allowing you to apply ‘Tags’ which are key:value pairs of metadata terms used primarily to filter and report on resources. This can be useful if, for example, you need to report on all Azure resources by department, or by owner.
Tags can be configured in several manners using Azure Policies which can enforce required tags.
When applying tags to resources, a user may either enter a new tag or select an existing tag that is populated based on previously entered tags. This also works for tag values which are taken from historical entries assigned to that tag name.
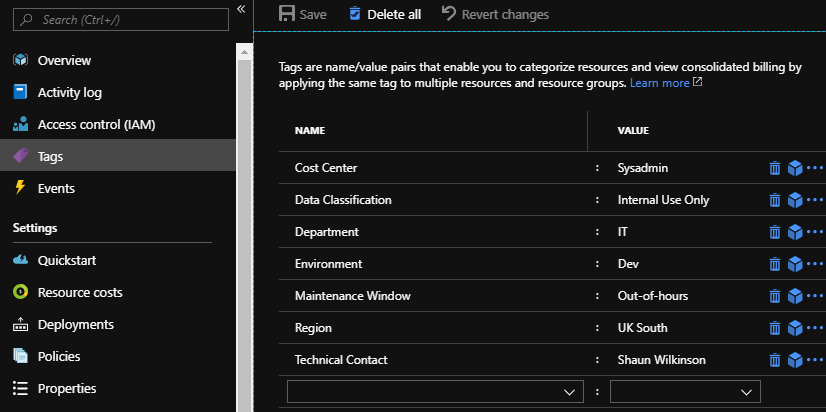
Applied tags are visible in either the Tags menu item or in the Overview of the resource group and individual resources as shown below (which shows the same resource as above).

There are various limitations on tags as described below (taken from the Microsoft documentation) –
- Not all resource types support tags.
- Each resource or resource group can have a maximum of 15 tag name/value pairs. This limitation applies only to tags directly applied to the resource group or resource.
- The tag name is limited to 512 characters, and the tag value is limited to 256 characters. For storage accounts, the tag name is limited to 128 characters, and the tag value is limited to 256 characters.
- Virtual Machines are limited to a total of 2048 characters for all tag names and values.
- Tags applied to the resource group are not inherited by the resources in that resource group.
- Tags can’t be applied to classic resources such as Cloud Services.
- Tag names can’t contain these characters: <, >, %, &, \, ?, /
Further information on this can be found at – https://docs.microsoft.com/en-us/azure/azure-resource-manager/resource-group-using-tags
Move resources across resource groups
Individual resources may be moved between resource groups as required.
There are various limitations on what type of resources may be moved, for a full list refer to the Microsoft documentation link further down as it’s a fairly substantial list. There are also various limitations that apply to specific types of resources such as VM’s created as part of marketplace resources with attached plans cannot be moved.
Moving a resource
Resources may be moved by doing the following –
- Navigate to the resource you want to move.
- In the ‘Overview’ page select the ‘Move’ button.
- Select whether the item will be moved to either another resource group or to another subscription entirely.
- Then select the individual resources you wish to move, by default the current resource is selected.
- Select either the resource group to move the resources to or click ‘Create a new group’ then enter a name for the new group.
- Finally, check the warning regarding resource ID’s then click OK.
- Depending on the resources being moved this may take some time.
Further information can be found at – https://docs.microsoft.com/en-us/azure/azure-resource-manager/resource-group-move-resources
Remove resource groups
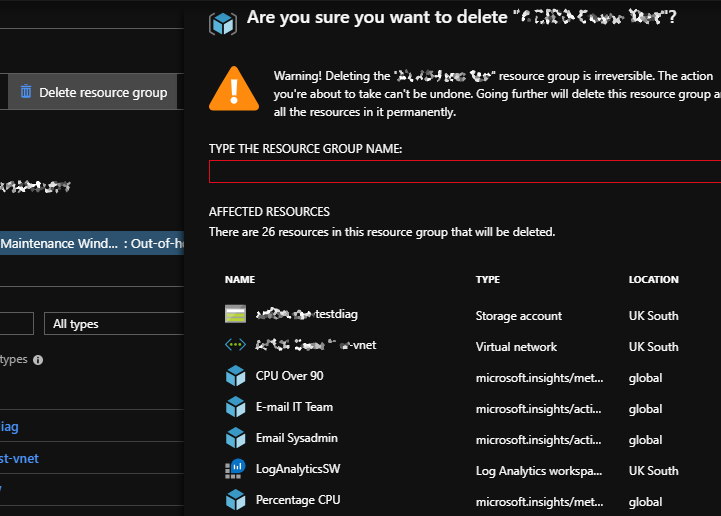
Resource groups can be deleted by navigating to the groups’ Overview page then selecting the ‘Delete Resource group’ button. You will then be required to enter the resource groups name before clicking Delete to remove the group.
Deletion is irreversible.
The ability to remove resource groups may be managed by Locks which can be configured to disallow deletion until the lock is removed.
Further information may be found at – https://docs.microsoft.com/en-us/azure/azure-resource-manager/resource-group-delete


Leave a comment