This will be a fairly short article on my experience migrating Azure Virtual Machines that were connected to our On-Premise Domain Controllers to Azure Active Directory Domain Services (DS). Luckily most of the servers had been configured in such a way as to reduce the usage of any domain users which simplified the process greatly, but I will cover what things to check below.
Firstly, what is Azure Active Directory Domain Services? Well, it’s effectively a simplified Domain Controller hosted in Azure which allows us to fairly simply authenticate directly against Azure AD and provides us with the basic tools to maintain a domain in the cloud. Currently this is a better offering than Microsoft’s new ‘Azure Login for Windows’ plugin which is a bare-bones authentication plugin thanks to it allowing much more powerful management.
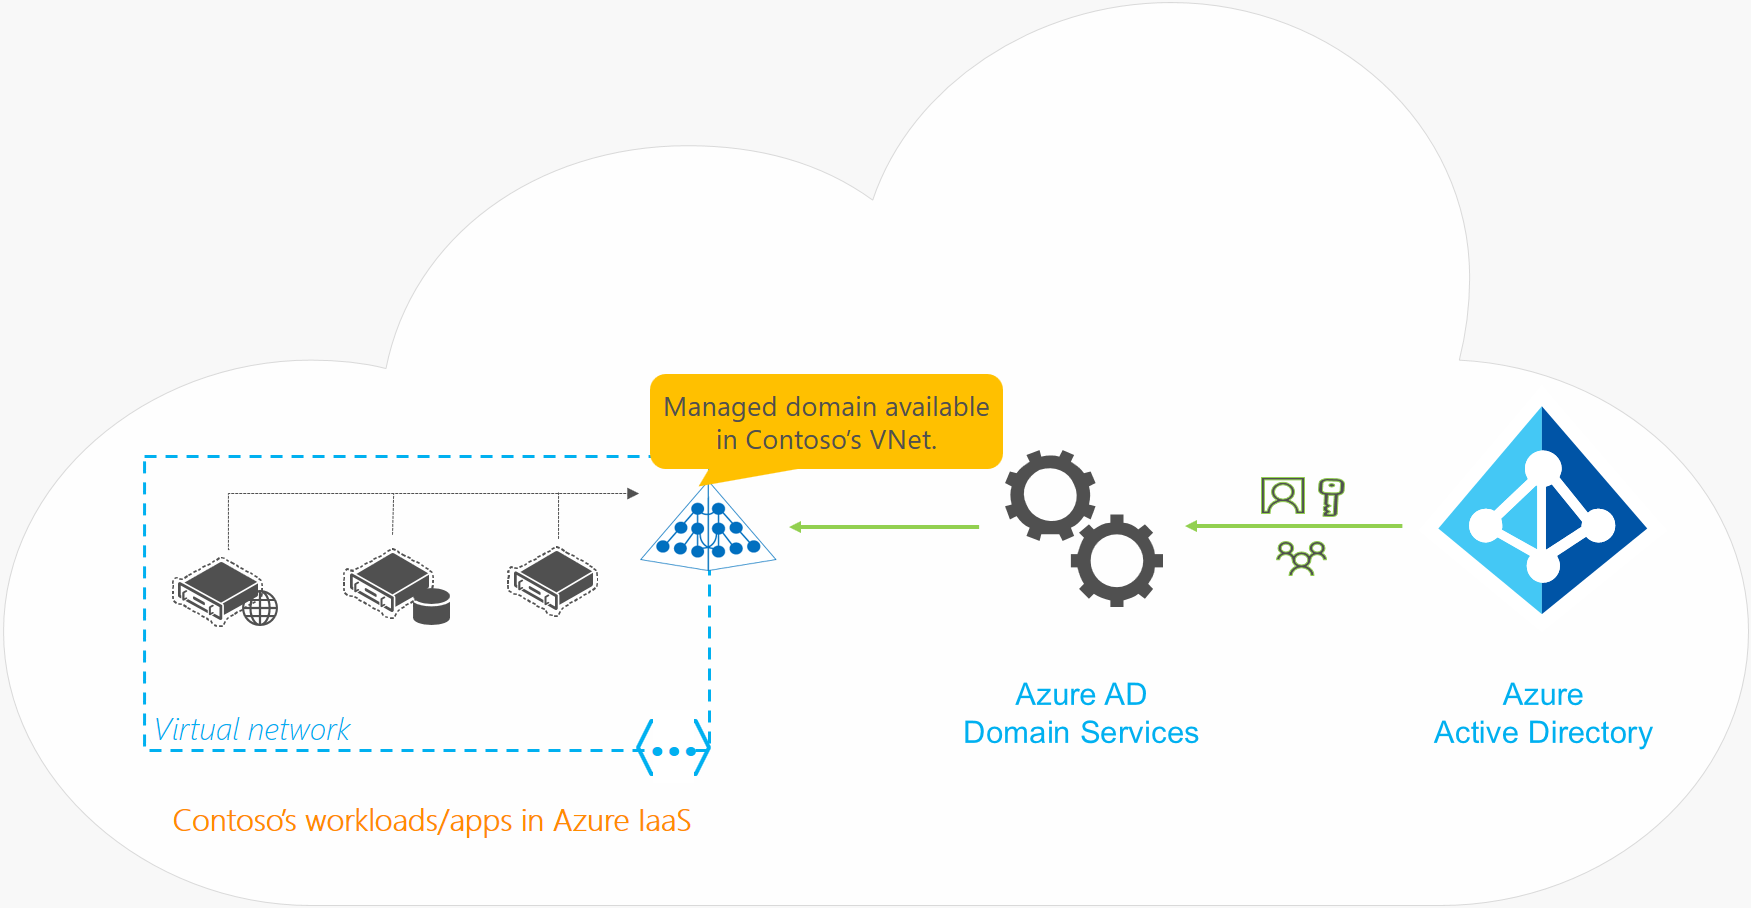
The image below taken from the official Microsoft documentation provides a good overview of how AD DS fits into the overall picture –
The Overall Process
So roughly we’re going to be following this process –
- Check Services, App Pools etc on the Virtual Machine, Reconfigure any services using a domain user to a local user where possible or note anything that will break so it can be fixed once the migration is complete.
- Set up Azure Active Directory Domain Services in a new resource group.
- Set up a VM in the DS resource group where we’ll install the Active Directory tools just so we can quickly add the AD DC Admins group to the Remote Users. Will simplify things for us later.
- Peer the VNets of the DS setup and the VNet of the VM to migrate.
- Set the DNS servers on the remote VM to point to the DS IP’s.
- Restart the VM.
- Change the domain of the VM to the new domain.
- Restart the VM.
- Log in with an admin user.
- Update any services etc.
I’ll cover all this in further detail and link off to the relevant Microsoft documentation as well.
Setting up Azure Active Directory Domain Services
So for this step we’re directly following the Microsoft Documentation – https://docs.microsoft.com/en-us/azure/active-directory-domain-services/tutorial-create-instance.

- Create a new ‘Azure AD Domain Services’ from the Create a resource page.
- Select the relevant Subscription to place it in.
- Create a new resource group as there are a lot of related resources that will be created.
- You will need to specify a DNS domain name for the new domain, make sure to follow the guidelines below –
- Use a routable domain – Don’t use contoso.local for example as it can cause issues with DNS resolution.
- Do not use the same domain as an existing or On-Premise domain. It can cause conflicts.
- There are further guidelines at the link above, but these are by far the most important considerations.
- Fill in all the other fields, only one to pay attention to for now will be the SKU. ‘Standard’ will suffice for most organisations but be sure to check the guidelines for choosing the right value – https://docs.microsoft.com/en-us/azure/active-directory-domain-services/administration-concepts#azure-ad-ds-skus
- Finally, select ‘Create’ on the Summary page. Set up can take up to about an hour and a half in my experience.
Configuring AAD DS

Once Domain Services has deployed fully you then need to navigate to the new resource and go to the Overview view. Under ‘Required configuration steps’ select ‘Configure’. Further info on this can be found at https://docs.microsoft.com/en-us/azure/active-directory-domain-services/administration-concepts#azure-ad-ds-skus
Notes
- Users will not be able to authenticate until they have changed their password after AAD DS is configured. This is caused by the fact that Azure AD doesn’t store plaintext passwords and cannot generate the necessary password hashes.
- If using Azure AD Sync be sure to read the additional required steps – https://docs.microsoft.com/en-us/azure/active-directory-domain-services/tutorial-configure-password-hash-sync
Azure Peering Setup

Full setup instructions on the required peering setup can be found at https://docs.microsoft.com/en-us/azure/active-directory-domain-services/tutorial-configure-networking#configure-virtual-network-peering.
Azure Peering allows for two separate Virtual Networks to be connected without the use of a dedicated VPN setup and is ideal for Azure DS, the steps to peer VNets are fairly straightforward –
- Access the Domain Services virtual network, by default it’s called “aadds-vnet”.
- Select ‘Peerings’ in the left-hand navigation.
- Select ‘Add’ and fill in the relevant details –
- Virtual network deployment model should be kept to ‘Resource Manager’.
- Select the Subscription of the target Vnet then the Virtual network.
- Keep the ‘Configuration’ section to the defaults unless you have a specific reason to do otherwise.
- Click OK.
The peering will take a minute or so to set up and then the Peering Status should show ‘Connected’.
Setting up DNS in the Peered VNet
Full setup instructions can be found here – https://docs.microsoft.com/en-us/azure/active-directory-domain-services/tutorial-configure-networking#configure-dns-servers-in-the-peered-virtual-network
You will need to either configure the target Virtual Networks’ DNS settings or modify the network device on the Virtual Machine to point to the Domain Service IP’s.
This allows the target VM to resolve the domain name. Ideally, configure the overall Virtual Networks’ DNS settings as it will then apply to all resources in the Virtual Network, however it can be useful to change it on a single VM for testing purposes.
Virtual Network DNS
To modify the DNS for the entire target Virtual Network –
- Access the Virtual network of the target VM.
- Select DNS Servers in the left-hand navigation.
- Set DNS Servers to Custom and then add the DNS servers defined in the Azure AD Domain Services resource.
- You can find the DNS Server IP’s by going to the Azure AD Domain Services resources and selecting Properties. You’ll find the IP’s under “IP address on virtual network”.

- Once this is done restart any affected VM’s and they will then be able to connect to the AADDS domain properly
Single server
As an alternative to the above setup which will change the DNS servers for the entire network, you can instead set the DNS servers within the OS on any VM’s you want to test with, after a restart the servers DNS Servers will take priority over the DNS settings configured at the Virtual Network level.
Join Servers to the new AAD Domain Services Domain
At this point you can join any servers to the new domain, in this example I’ll be using az.contoso.ltd as the domain we’ll be joining. For a Windows server this is pretty straightforward –
- RDP into the Windows VM, ideally using a local admin user.
- Open Server Manager if it doesn’t open by default.
- Select “Local Server” in the left-hand menu.
- Select the ‘WorkGroup’ value to open the System Properties window.
- Click Change at the bottom right to open the “Computer Name/Domain Changes” window.
- Enter the domain name for your configured domain, in our case this is az.contoso.ltd.

- Click OK, then close the dialogs and restart when prompted.
- At this point you should be able to log in using your Azure UPN and password.


Leave a comment