
This article covers the “Create and configure a Network Security Group (NSG)” section of the AZ-100 and AZ-103 Exams and is part of my AZ-100 Study Notes series.
A Network Security Group is basically a network filter/firewall that allows you to restrict access to resources within a VNET, they are associated with Subnets or NIC’s rather than to VM’s directly.

Create security rules
Rules are enforced based on the priority level of the rule itself and the priority may range from 100 to 4096. Important to note that lower numbers hold priority rather than higher numbers.
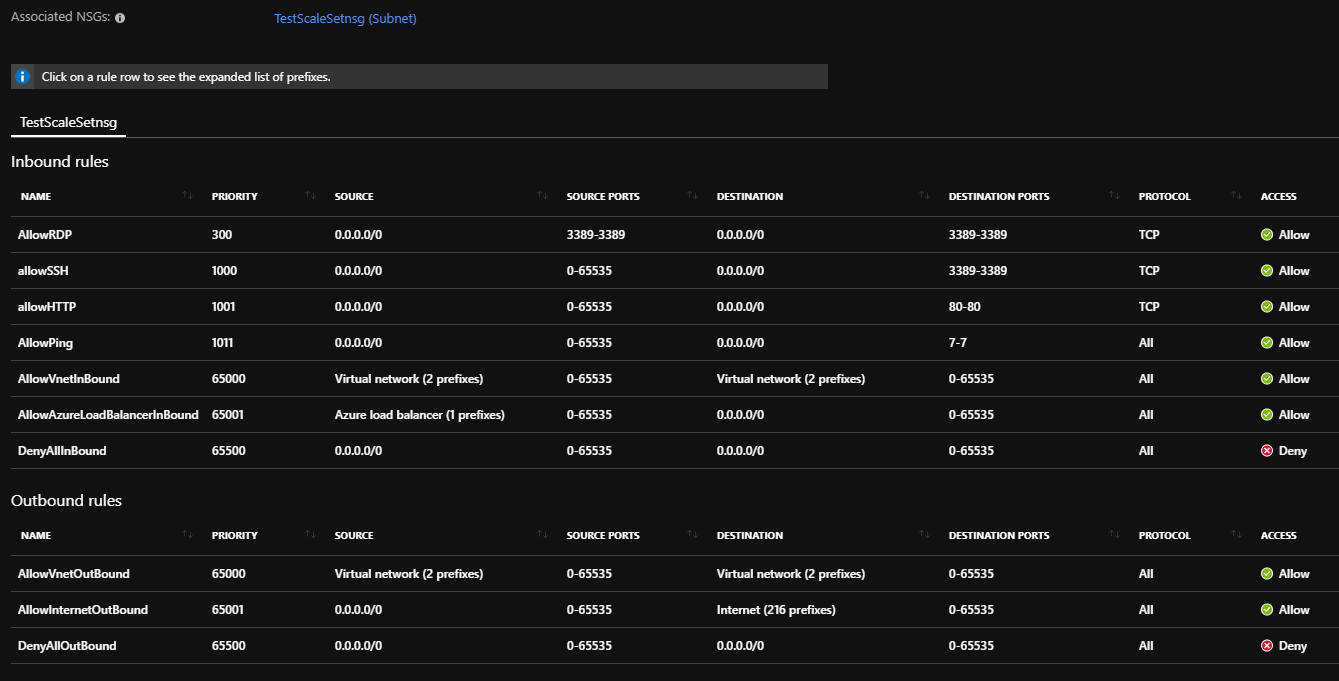
Inbound rules only effect data coming into the Subnet/NIC and Outbound rules only affect data going out, by default Inbound rules allow any communication within the same VNET and any data sent through an Azure Load Balancer, with all other traffic being denied by default. For Outbound rules any data from within the same VNET are allowed and Internet connections are allowed.
Security Rules may be created by navigating to an existing NSG and selecting either “Inbound security rules” or “Outbound security rules” depending on which you want to configure.
To configure an Inbound Rule –
- Click “Add”
- Select a source from the following –
- Any – All inbound traffic
- IP Addresses – A range of IP’s in CIDR format
- Service Tag – The most interesting, allows traffic in based on a service tag such as “SQL” or from certain locations such as “Storage.UKSouth”
- Provide a Source Port as either a single port, range or comma seperated list.
- Select a destination from –
- Any – Allows all destinations
- IP Addresses – A range of IP’s in CIDR format
- VirtualNetwork – Allows traffic to all IP’s in the address space
- Application Security Group – Allows you to select a ASP in the same region as the Network Interface.
- Provide a Destination port and a protocol and whether to allow or disallow traffic matching the rule.
- Finally provide a Priority for the rule (lower is higher priority).
- Provide a name then click Add.
More detailed information on this can be found at – https://docs.microsoft.com/en-us/azure/virtual-network/manage-network-security-group#work-with-security-rules
Associate NSG to a subnet or network interface
NSG’s may be associated with a subnet by navigating to the relevant subnet and selecting “Network security group”, you can then select the NSG to associate.
More detail on subnets specifically can be found at – https://docs.microsoft.com/en-us/azure/virtual-network/virtual-network-manage-subnet#change-subnet-settings

NSG’s may be associated with a Network Interface by navigating to the NIC and selecting “Network security group” in the navigation at which point you can click Edit then choose an existing NSG to associate.
More detail on NIC’s specifically can be found at – https://docs.microsoft.com/en-us/azure/virtual-network/virtual-network-network-interface#associate-or-dissociate-a-network-security-group
Identify required ports
Ports should ideally be identified based on the required functionality and documentation available online for specific service however Azure provides a useful tool called “NSG Flow Logs” which allow you to view information about ingress and egress IP traffic through an NSG.
NSG Flow Logs can be enabled by –
- Navigate to a Network Security Group.
- Select “NSG flow logs” in the “Monitoring” menu.
- Select the NSG.
- Select the “On” status and select either Version 1 or 2 of the Flow Logs. V1 logs logging of all traffic for both allowed and denied traffic, V2 will also provide throughput information.
- Select a Storage Account to associate the Flow log with, this will be used to store the data.
- Select the retention period.
- Click Save to create the new flow log.

Flows may then be downloaded by going to the associated Storage Account and selecting “Blobs” in the “Blob service” menu and then selecting the “insights-logs-networksecuritygroupflowevent” container. You can then navigate the folder hierarchy to get to a file named PT1H.json containing the logs, this can be found at –
https://{storageAccountName}.blob.core.windows.net/insights-logs-networksecuritygroupflowevent/resourceId=/SUBSCRIPTIONS/{subscriptionID}/RESOURCEGROUPS/{resourceGroupName}/PROVIDERS/MICROSOFT.NETWORK/NETWORKSECURITYGROUPS/{nsgName}/y={year}/m={month}/d={day}/h={hour}/m=00/macAddress={macAddress}/PT1H.json
More details on this can be found at – https://docs.microsoft.com/en-us/azure/network-watcher/network-watcher-nsg-flow-logging-portal
Evaluate effective security rules
Microsoft have a great article covering how to diagnose network filtering issues caused by security rules located here –https://docs.microsoft.com/en-us/azure/virtual-network/diagnose-network-traffic-filter-problem


Leave a comment