This article covers the “Create connectivity between virtual networks” section of the AZ-100 and AZ-103 Exams and is part of my AZ-100 Study Notes series.
VNETs by default are isolated from each other unless specifically configured otherwise. They provide Internet Access and connectivity between Azure Resources and also allow connecting to On-Premise networks and filtering and routing.
Azure will reserve the first three and Last IP from the VNET pool, meaning ip configs would start at 192.168.0.4 for example.
Creation
To create a VNET –
- Navigate to “Virtual networks”
- Click Add then provide a name for the new VNet.
- You then provide an Address Space, which is the range of IP’s allowed within the VNet.
- Select the Subscription, Resource Group and Location.
- Then define an initial Subnet by defining a name and the address range to utilise.
- Additional Subnets may be created by going into the new Vnet and selecting “Subnets” and then defining new subnets.
To create a Route –
- Navigate to “Route Tables”
- Select “Add” and provide a Name and select or create a Resource Group.
- Then select “Create”
- At this point we have a Route Table but we need to define custom routes.
- In Route Tables select “Routes” in the “Settings” menu then click “Add”.
- Define the route you want to configure and then click OK.
- Once that’s done we finally need to navigate to “Subnets” in the “Settings” menu and associate it with a subnet.
Create and configure VNET peering
VNET peering allows you to connect VNETs both within the same region and across regions.
To create a peering –
- Navigate to “Virtual networks” and select the VNET to apply a peering to.
- Select “Peerings” in the “Settings” menu and then click Add.
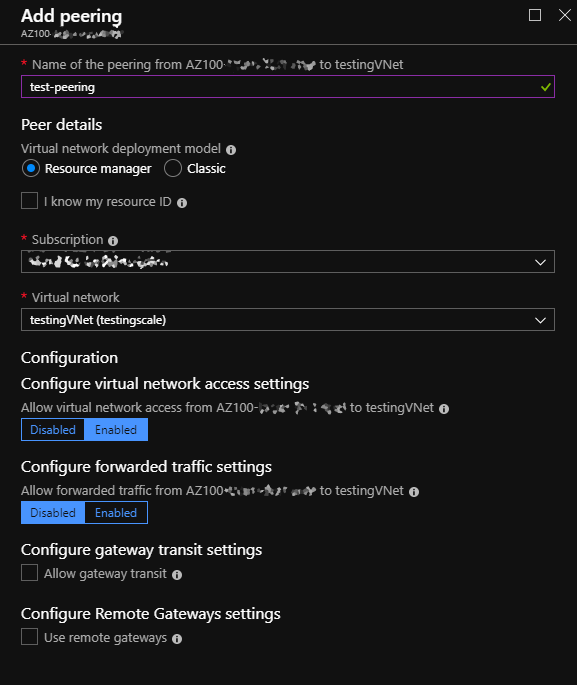
- Provide a name and optionally change the deployment model to Classic and select “I know my resource ID” if you do not have read access to the network we will connect to.
- Select the Subscription and then select the VNET that we’ll connect to.
- Now choose whether to enable “Allow virtual network access” which will if enabled allow data to flow between the networks, disabling this is a good alternative to deleting a peer if you just want to temporarily stop data between the networks.
- Choose whether to enable “Allow forwarded traffic” which if enabled will allow forwarding of data originating from outside the initial VNET to the second VNET.
- For “Allow gateway transit” and “Use remote gateways” options I’d suggest reading the Microsoft documentation in the link at the bottom of this section.

Microsoft has a good overview of how this works here – https://docs.microsoft.com/en-us/azure/virtual-network/virtual-network-manage-peering
Create and configure VNET to VNET
So now we know how to create a Peer however the Peering Status is only set to Initiated and not Completed because the VNET peer must be set up from both sides.
Navigate to the other Virtual network and configure another peering from the second to the first VNET and once created the status changes to Connected on both VNET peers showing that there is an active connection between them.

There is also a tutorial which walks you through creating a connected VNET to VNET – https://docs.microsoft.com/en-us/azure/virtual-network/tutorial-connect-virtual-networks-portal
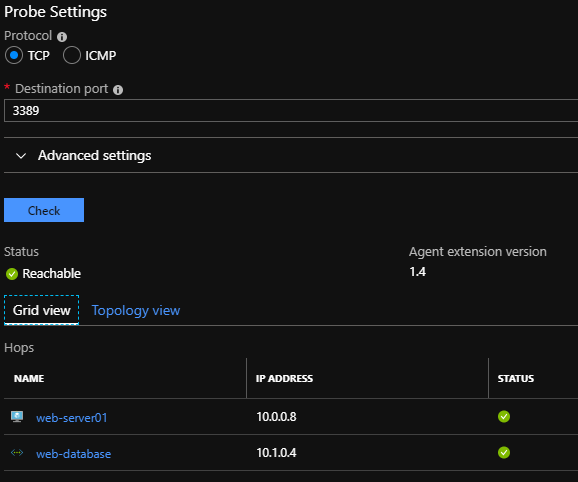
Verify virtual network connectivity
The primary method of checking network connectivity is using what’s called a “Network Watcher” within the same region as the resource to test.
More information on this can be found at – https://docs.microsoft.com/en-us/azure/network-watcher/network-watcher-connectivity-portal
Create virtual network gateway
To create a Virtual Network gateway –
- Navigate to “Virtual Network Gateways”.
- Provide a Name and select the Gateway Type –
- VPN – A private network connecting two points over the internet.
- ExpressRoute – A dedicated connection between On-Premise and Azure provided by a Microsoft supplier.
- Select the SKU to use –
- Select the Virtual Network that will send and receive data, must already have a gateway subnet setup on the Network.
- Either select an existing public IP or create a new one.
- Finally, click Create to create the new Network Gateway.
You then need to configure the Local Network Gateway and then finally connect the Virtual and Local gateways in Azure, both of which are covered in the link below.
For a full guide on setting up a Site-to-Site Connection look here – https://docs.microsoft.com/en-us/azure/vpn-gateway/vpn-gateway-howto-site-to-site-resource-manager-portal


Leave a comment