
This article covers the “Manage Azure VM” section of the AZ-100 and AZ-103 Exams and is part of my AZ-100 Study Notes series.
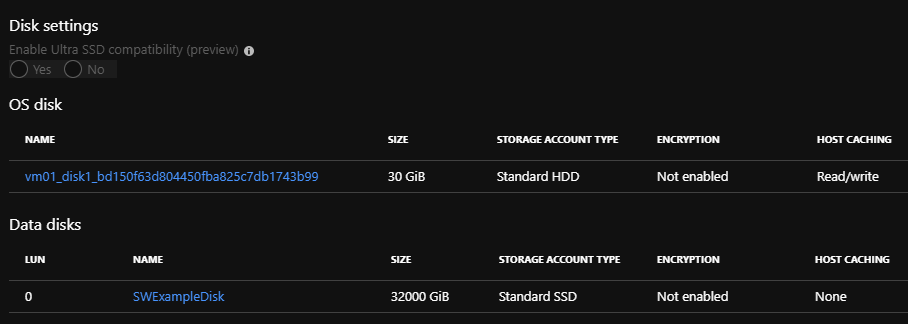
Add data discs
There are two primary types of Data Disks available for VM’s –
- Standard Storage
- Utilizes HDD’s and the which is the cheapest option of the two, it is limited to a max throughput of 60MB/s per disk however and a maximum of 500 IOPS (Input/Output operations) per disk.
- Premium Storage
- Utilizes SSD’s and is much higher performance than the Standard Storage but does include a higher cost. Premium does provide 250MB/s throughput per disk and 7500 IOPS per disk though which makes it ideal for apps requiring intensive disk operations.
The Microsoft documentation on creating and attaching disks can be found at – https://docs.microsoft.com/en-us/azure/virtual-machines/windows/attach-managed-disk-portal
Worth mentioning that the type and size of the created disk will have an effect on the IOPS limit and Throughput of the disk, more information on each type of disk can be found at – https://docs.microsoft.com/en-us/azure/virtual-machines/windows/disks-types
Add network interfaces
There’s a fairly comprehensive guide on this at – https://docs.microsoft.com/en-us/azure/virtual-network/virtual-network-network-interface-vm
Worth noting that when you create a new VM a default network interface is created, it’s not possible to associate an existing network card during creation.
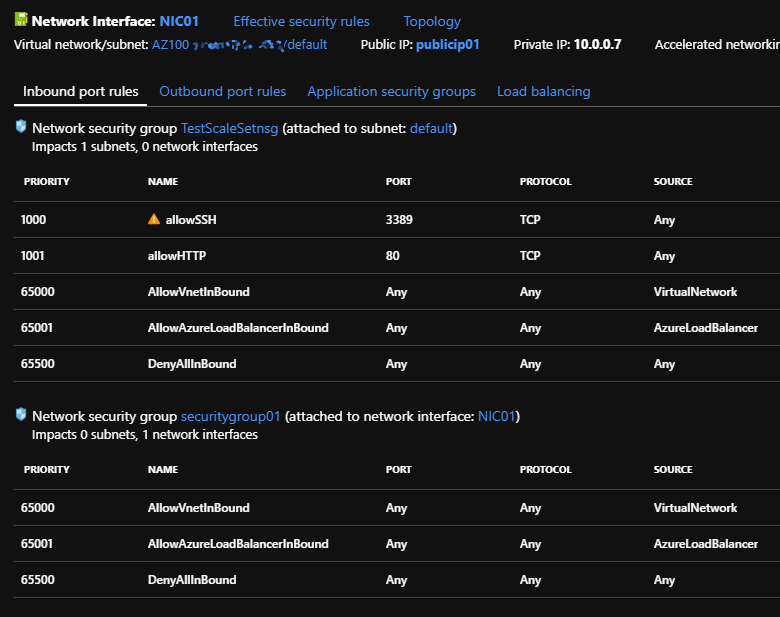
Although a VM may have multiple NIC’s, you cannot associate a single NIC with multiple VM’s.
It’s worth reading through the various constraints of network interfaces – https://docs.microsoft.com/en-us/azure/virtual-network/virtual-network-network-interface-vm#constraints
Automate configuration management by using PowerShell Desired State Configuration (DSC) and VM Agent by using custom script extensions
Microsoft has a seemingly excellent overview of DSC at – https://docs.microsoft.com/en-us/azure/automation/automation-dsc-overview
If the machines you wish to use DSC on are behind a private network then there are a few ports and URLs that are required to be open to the connecting machines –
- Port 443 for outbound internet access
- *.azure-automation.net
- https://<workspaceId>.agentsvc.azure-automation.net
Although it is suggested that the addresses should be added as exceptions in cases where IP’s are the only (or best) option then Microsoft do provide a constantly updated IP Range file – https://www.microsoft.com/en-us/download/details.aspx?id=41653
Finally Microsoft do provide a ‘Getting Started’ article which seems fairly straightforward – https://docs.microsoft.com/en-us/azure/automation/automation-dsc-getting-started
Manage VM sizes
An Azure VM’s size may be changed after creation either through the portal or by using PowerShell.
In Azure it’s as simple as navigating to the VM and selecting “Size” in the “Settings” blade. Then selecting the size you want to move to and clicking “Resize”.
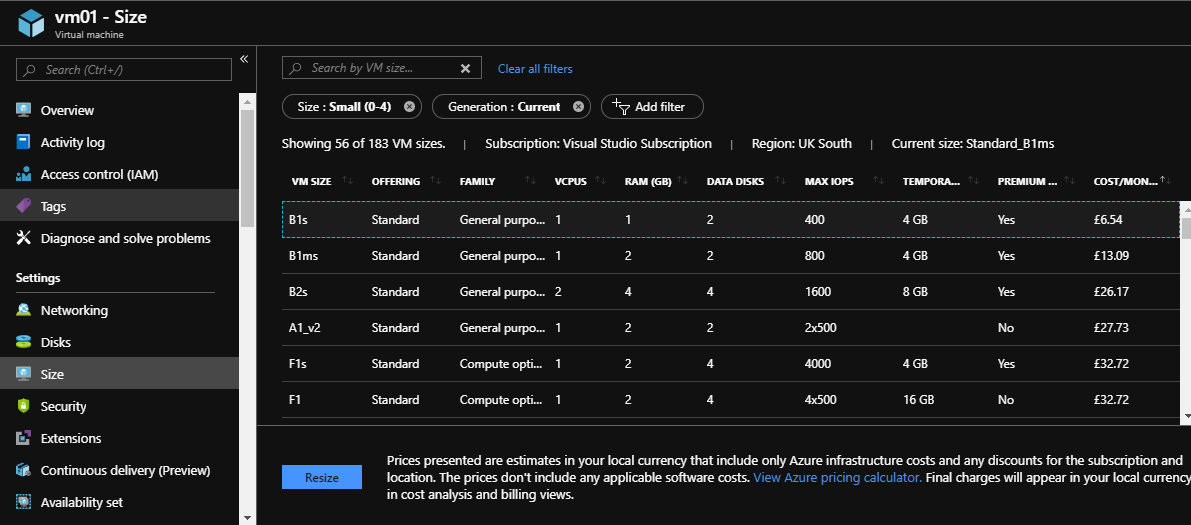
There is a major limitation to be aware of when doing this, a VM may only be changed to a VM type that is in the same hardware cluster when it is running at the time of resize. So you couldn’t for example go from an A0 to an F series without first stopping and deallocating the VM.
There is a great write up of this and the overall process of resizing VM’s at –https://thuansoldier.net/6515/
For doing this via PowerShell I’d suggest taking a look at the Resize-VM documentation – https://docs.microsoft.com/en-us/azure/virtual-machines/windows/resize-vm
Move VMs from one resource group to another
VM’s in Azure are moved by navigating to the containing Resource Group and selecting “Move” in the top bar of the “Overview” page. This then allows you to either move to another resource group or to another subscription entirely.
Once you’ve selected move you then are taken to the “Move resources” page at which point you may select the individual VM and any related resources and then select the Resource Group and Subscription to move the resources to.
It is also possible to move resources using PowerShell using the following commands
Get-AzResource -ResourceGroupName <sourceResourceGroupName> | Format-table -Property ResourceIdThis gets a comma-separated list of all resource ID’s of resources with a given group name, this can then be either be populated into a variable to pass to the move command or used as a source for you to pick out important resource ID’s. This is then used in one of the following commands, the first moves to another resource group, whereas the second moves to another subscription –
Move-AzResource -DestinationResourceGroupName "<myDestinationResourceGroup>" `
    -ResourceId <myResourceId,myResourceId,myResourceId>

Move-AzResource -DestinationSubscriptionId "<myDestinationSubscriptionID>" `
    -DestinationResourceGroupName "<myDestinationResourceGroup>" `
    -ResourceId <myResourceId,myResourceId,myResourceId>
Further information on this can be found at – https://docs.microsoft.com/en-us/azure/virtual-machines/windows/move-vm
Redeploy VMs
It can be useful occasionally to redeploy an Azure VM , especially when having issues with RDP connections. When a machine is redeployed Azure automatically shuts the machine down and moves the VM to a new resource group before powering on the machine again.
You can redeploy a VM using the following PowerShell –
Set-AzVM -Redeploy -ResourceGroupName "myResourceGroup" -Name "myVM"Or you can redeploy via the Azure Portal by navigating to the Virtual Machine and selecting “Redeploy” in the “Support + troubleshooting” menu.
More information on this can be found at – https://docs.microsoft.com/en-gb/azure/virtual-machines/troubleshooting/redeploy-to-new-node-windows


Leave a comment