This article covers the “Automate deployment of VMs” section of the AZ-100 and AZ-103 Exams and is part of my AZ-100 Study Notes series.
Modify Azure Resource Manager (ARM) template
An ARM template is made up of the following elements –
{
  "$schema": "https://schema.management.azure.com/schemas/2015-01-01/deploymentTemplate.json#",
  "contentVersion": "",
  "apiProfile": "",
  "parameters": {  },
  "variables": {  },
  "functions": [  ],
  "resources": [  ],
  "outputs": {  }
}
Full details of all of these can be found at – https://docs.microsoft.com/en-us/azure/azure-resource-manager/resource-group-authoring-templates
The link above also goes into great detail regarding how various resources can be created.
For modifying existing resources Microsoft have some great documentation available at – https://docs.microsoft.com/en-us/azure/architecture/building-blocks/extending-templates/update-resource
Configure location of new VMs
Unsure as this seems quite straightforward, the way to do it via an ARM template would be –
"location": {
      "type": "string",
      "defaultValue": "[resourceGroup().location]",
      "metadata": {
        "description": "Location for all resources."
      }
    }
This is taken from the example PS template for creating a new vm and takes the overall resource groups location as the location for the VM.
Otherwise, this is configured as part of VM creation.
To move an existing VM would require copying its image and any dependencies to the new region as far as I can tell.
Configure VHD template
Information on this can be found at – https://docs.microsoft.com/en-us/azure/marketplace/cloud-partner-portal/virtual-machine/cpp-deploy-vm-user-image
The link above describes the entire process of deploying a VHD from a template.
Also worth going through – https://docs.microsoft.com/en-us/azure/virtual-machines/windows/create-vm-specialized#option-2-upload-a-specialized-vhd, this describes using a specialized VHD which allows you to move from a local virtual environment to Azure.
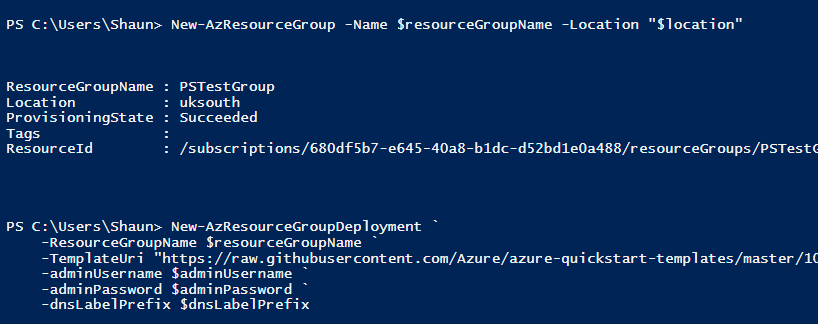
Deploy from template
A simple ARM template for creating a 2016 DataCenter (by default) VM can be found here – https://docs.microsoft.com/en-us/azure/virtual-machines/windows/ps-template
The page above has a “Try it” option which will allow you to mess around with this using the Azure CLI which is extremely useful.
Basic notes are use a configured json ARM template with a PowerShell script to populate the variables and kick off the Resource Group and Virtual Machine creation.

Save a deployment as an ARM template
A deployed Azure VM can be downloaded by navigating to the VM and selecting “Export template” and “Download” which downloads a zipped file containing all for deploying a VM with the same configuration as the current VM.
Worth noting that some resource types cannot be exported yet, this will be shown on the “Export template” page as an alert banner at the top.
It is also possible to download a template for a VM using PowerShell –
Export-AzResourceGroup -ResourceGroupName "myResourceGroup" -Path "C:\users\public\downloads"More information can be found here – https://docs.microsoft.com/en-us/azure/virtual-machines/windows/download-template
Deploy Windows and Linux VMs
Compared to the other sections this is fairly generic, I suggest going through the quick start guides for deploying both Windows and Linux VM’s via PowerShell at the minimum –


Leave a comment