
This will be the first post of a larger series, aiming to simplify the often complex task of managing and reducing your Azure spend. The series is primarily aimed towards IT professionals looking to implement effective and straightforward cost-saving measures.
I’ll start with basic strategies that provide immediate savings and gradually progress to more advanced techniques, ensuring that you have the tools and knowledge to optimize your Azure costs at every level in as simple a manner as possible, I’ll make mention of where I think basic scripting can simplify the task and I’ll avoid using 3rd party tools where they have an associated cost.
In this post I’ll explore how to identify and remove unneeded Virtual Machines (VMs). By ensuring that only essential VMs are running, you can save significantly on your Azure bill without compromising your infrastructure’s performance.
This post is part of my Azure Cost-Saving Series. For more tips on reducing your Azure costs, check out the full series here: Sysadmin Central – Cost Saving Series.
- Identifying Idle or Unneeded VMs in Azure
- Removing or Deallocating Unneeded VMs
- Resize VMs for Cost Efficiency
- Monitoring and Maintaining VM Efficiency
- Best Practices for Continuous VM Sizing Optimisation
- Conclusion
Identifying Idle or Unneeded VMs in Azure
The first step in optimizing your Azure costs is identifying which Virtual Machines are no longer needed or which may be underutilized. Azure provides several tools which can be used to do this, making it easier to pinpoint where you can cut costs without affecting your operations.
Step 1: Log in to the Azure Portal
To begin, sign in to the Azure Portal using your credentials. This is where you’ll manage and monitor your resources.
Step 2: Navigate to the “Virtual Machines” Section
Once logged in, navigate to the “Virtual Machines” section. Here, you’ll see a list of all the VMs in your environment. This is your starting point for identifying potential cost-saving opportunities.
It may be worth exporting this list as a CSV or similar to more easily track which VM’s have been reviewed and any outstanding actions.
Step 3: Use the “Metrics” Tab to Identify Idle VMs
In the Virtual Machines overview, click on a VM to view its details. Under the “Monitoring” section, you’ll find the “Metrics” tab. This section provides insights into the VM’s CPU usage, disk operations, and other performance metrics. Look for VMs with consistently low CPU utilization or minimal activity over a prolonged period. These are prime candidates for deallocation, deletion, or downsizing.
- Look for Trends: Review these metrics over a 30-day period to identify trends rather than focusing on a single data point. Consistent underutilization across multiple metrics suggests the VM is a candidate for downsizing.
- Cross-Check with Workload Requirements: Ensure that the metrics align with the workload’s requirements. For example, if a VM is meant to handle high network traffic but shows low usage, it may be oversized or not fully utilized.
By understanding and analyzing these metrics, you can make informed decisions about whether to resize, reconfigure, or even decommission your VMs to ensure that your Azure environment is both cost-effective and efficient.
Step 4: Analyze VM Costs Using Azure Cost Management + Billing
To get a broader view of your VM costs, use the Azure Cost Management + Billing tool. This tool allows you to analyze costs at a granular level and identify which VMs are contributing most to your Azure spend. Combine this data with the performance metrics to determine which VMs are no longer cost-effective and where your time will have the most impact.
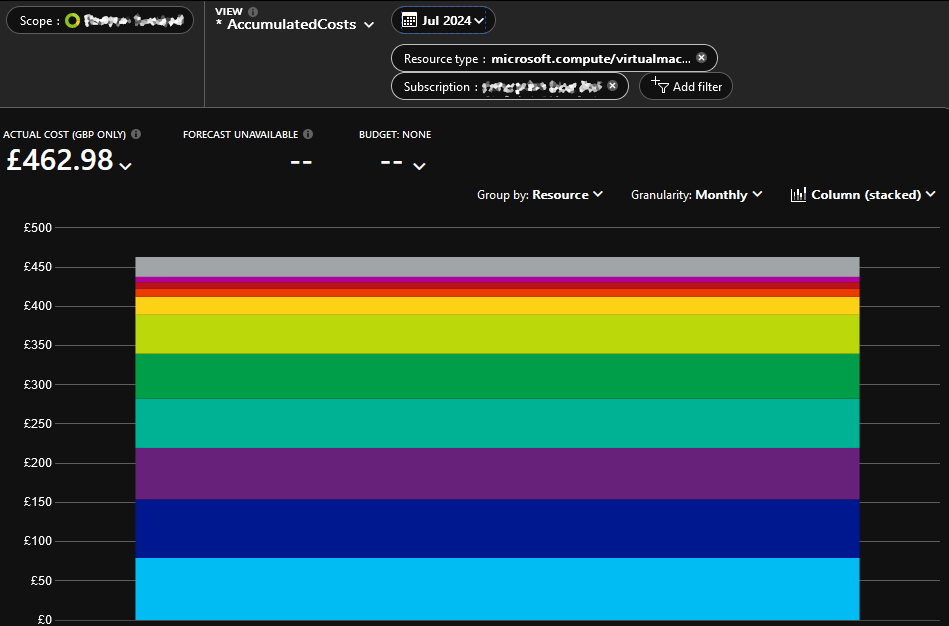
To focus the cost reporting on VM costs, apply a Resource Type filter set to “microsoft.compute/virtualmachines” to limit reports to just your VM resources.
For a straightforward way to identify your most expensive VMs, adjust the time filter to “Last Month,” set the Resource Type to “microsoft.compute/virtualmachines,” group by “Resource,” set Granularity to “Monthly,” and change the chart type to “Column (stacked).” You can then export this view as a CSV file, allowing you to easily sort and analyze the data.
Step 5: Implement Proper Tagging of Resources
Before taking any action, it’s important to implement proper tagging of your VMs and other resources. Tagging helps you track who owns each resource, its purpose, and its department. This is crucial for future audits and makes it easier to contact VM owners before proceeding with deallocation or deletion.
- How to Tag Resources: In the VM details, go to the “Tags” section and add relevant tags such as “Owner,” “Department,” and “Environment.” You can also use PowerShell to apply tags in bulk across multiple VMs, streamlining the process if you manage a large number of resources.
By properly tagging your resources, you ensure that your cost-saving efforts are organized and that any actions taken are well-documented and communicated to the relevant stakeholders.
Removing or Deallocating Unneeded VMs
After identifying the VMs that are no longer necessary, the next step is to remove or deallocate them. This process ensures that you’re not paying for resources you aren’t actively using, leading to immediate cost savings.
Step 1: Review the Identified VMs
Before taking any action, it’s essential to review the VMs you’ve identified as idle or unneeded. Confirm with the resource owners (using the tags you’ve implemented) that these VMs are no longer required. This step prevents any unintended disruption to your services.
Step 2: Deallocate or Delete the VMs via the Azure Portal
Once you have confirmation, you can proceed with deallocating or deleting the VMs:
- Deallocating a VM: Deallocating a VM stops it and releases the compute resources, but it keeps the associated disks and other data intact. This option is ideal if you might need to restart the VM in the future. To deallocate a VM:
- Go to the “Virtual Machines” section in the Azure Portal.
- Select the VM you want to deallocate.
- Click on “Stop” at the top of the VM’s overview page. This action will deallocate the VM, and you will stop incurring compute costs.
- Deleting a VM: If the VM is no longer needed, deleting it is the best option to completely eliminate any associated costs. Be aware that this action cannot be undone, and all associated data will be lost unless it’s backed up.
- Go to the “Virtual Machines” section in the Azure Portal.
- Select the VM you want to delete.
- Click on “Delete” at the top of the VM’s overview page and confirm the deletion.
- Ensure you delete any remaining resources that were linked such as disks, Virtual Networks, Public IPs and the likes.
Step 3: Use PowerShell for Bulk Actions
If you’re managing multiple VMs, manually deallocating or deleting each one can be time-consuming. PowerShell provides a way to automate these actions by utilising the Az.Compute PowerShell module (If you’d like me to cover this in more detail, please ask so I know it’s wanted!):
Deallocate Multiple VMs Using PowerShell:
# Deallocates multiple VMs by their names
$vmNames = @("VM1", "VM2", "VM3")
foreach ($vm in $vmNames) {
     Stop-AzVM -ResourceGroupName "YourResourceGroupName" -Name $vm -Force
}
Delete Multiple VMs Using PowerShell:
# Deletes multiple VMs by their names
$vmNames = @("VM1", "VM2", "VM3")
foreach ($vm in $vmNames) {
     Remove-AzVM -ResourceGroupName "YourResourceGroupName" -Name $vm -Force
}
By using PowerShell, you can efficiently manage large environments, ensuring that your deallocation or deletion processes are consistent and time-effective.
Resize VMs for Cost Efficiency
Step 1: Determine the Appropriate VM Size Based on the Analysis
After reviewing the metrics, the next step is to choose a more appropriate VM size. Azure offers a wide range of VM types, each with different configurations and pricing. However, to make a more informed decision, consider using third-party tools like Azure Instances and CloudPrice.
- Azure Instances: This tool allows you to compare Azure VM types in detail, helping you find the best match based on your workload’s specific needs.
- CloudPrice: This platform helps you compare pricing across different VM sizes and regions, giving you a clearer picture of potential savings.
By using these tools, you can identify the most cost-effective VM size that still meets your requirements.
Step 2: Resize a VM through the Azure Portal
Once you’ve determined the appropriate size, resizing your VM in the Azure Portal is straightforward:
- Navigate to the “Virtual Machines” section and select the VM you wish to resize.
- Click on “Size” under the “Settings” menu.
- Choose the new size from the list of available options. The portal will display estimated costs for each size.
- Click “Resize” to apply the changes. Note that resizing might involve some downtime, so plan accordingly.
Step 3: Resize Multiple VMs Using PowerShell
If you manage multiple VMs that require resizing, PowerShell offers an efficient way to do this in bulk using the Az.Compute module:
# Resizes multiple VMs to a specified size
$vmNames = @("VM1", "VM2", "VM3")
foreach ($vm in $vmNames) {
     Resize-AzVM -ResourceGroupName "YourResourceGroupName" -VMName $vm -Size "Standard_DS2_v2"
}
This script shows an example of how to resize all specified VMs to the “Standard_DS2_v2” size. You’ll also need to connect to Azure and various other things, I’m happy to expand on this further if requested.
Monitoring and Maintaining VM Efficiency
Identifying and removing unneeded VMs is an essential step in optimizing your Azure costs, but maintaining efficiency requires ongoing attention. Implementing regular monitoring and automated processes can help you stay on top of your VM usage and prevent unnecessary costs from creeping back into your environment.
Set Up Alerts for VM Usage
To ensure that you catch idle or underutilized VMs in the future, set up alerts in Azure Monitor (these are best for smaller scale environments, for larger environments you’ll want to look at Metric Alert Rules or other solutions such as scripting and/or 3rd party software, again, I’m happy to cover all of this if there’s interest). These alerts can notify you when a VM’s CPU usage falls below a certain threshold for an extended period, allowing you to take action before unnecessary costs accumulate.
- How to Set Up Alerts:
- In the Azure Portal, navigate to “Monitor.”
- Select “Alerts” and click on “Create” and then “Alert Rule”.
- Choose the appropriate resource (your VM) and configure the alert condition based on CPU usage or other relevant metrics.
- Set up the action group to receive notifications via email or other channels.
These can also be set up directly from the Virtual Machines page, which may be simpler than finding resources via the Monitor Alerts page.
Automate VM Shutdown and Startup
For VMs that don’t need to run continuously, consider automating their shutdown and startup times. This is particularly useful for development and testing environments where VMs are only needed during business hours.
Historically this would most often be done using a Runbook and Azure Automation, however, the modern best practice is to utilise the new Start/Stop VMs v2 solution, which is specially designed by Microsoft to be a low-cost, flexible solution to handle this requirement as per the brief intro below –
The Start/Stop VMs v2 feature starts or stops Azure Virtual Machines instances across multiple subscriptions. It starts or stops virtual machines on user-defined schedules, provides insights through Azure Application Insights, and send optional notifications by using action groups. For most scenarios, Start/Stop VMs can manage virtual machines deployed and managed both by Azure Resource Manager and by Azure Service Manager (classic), which is deprecated.
This new version of Start/Stop VMs v2 provides a decentralized low-cost automation option for customers who want to optimize their VM costs. It offers all of the same functionality as the original version that was available with Azure Automation, but it’s designed to take advantage of newer technology in Azure. The Start/Stop VMs v2 relies on multiple Azure services and it will be charged based on the service that are deployed and consumed.
Best Practices for Continuous VM Sizing Optimisation
Optimizing VM sizes shouldn’t be a one-time task. Workloads can change over time, so regularly reviewing and adjusting VM sizes ensures that your resources remain aligned with actual needs.
- Regularly Review VM Usage: Set a recurring schedule to review VM performance metrics, adjusting sizes as needed.
- Implement Alerts: Use Azure Monitor and Metric Alerting to set up alerts that notify you when a VM is consistently underutilized. This proactive approach helps you avoid overspending.
- Use Azure Advisor: Azure Advisor offers personalized recommendations for optimizing your resources, including VM sizing. Regularly check its suggestions to ensure you’re not missing any opportunities to save.
Conclusion
By following these steps to identify, remove, and monitor your Virtual Machines in Azure, you can make significant savings on your Azure bill. Regularly reviewing your VMs, implementing proper tagging, and setting up automated processes will ensure that your environment remains cost-efficient over time.
Stay tuned for the next post in this series!


Leave a reply to The Azure Cost Saving Series – Sysadmin Central Blog | Telkom University Cancel reply