Linux Mint’s Nemo file manager is a powerful tool and it becomes even more useful when you start creating your own custom actions. In this quick guide, I’ll show you how to add a right-click menu option to convert any common image format to .webp using the WebP command-line tools and Nemo’s built-in extension system.
Prerequisites
Before we create the custom action, you’ll need to install the webp tools if you haven’t already –
sudo apt update
sudo apt install webp
This provides cwebp, the CLI utility used to convert images.
Create the Right-Click Menu Entry
First, create a new file in your local Nemo actions directory –
mkdir -p ~/.local/share/nemo/actions
nano ~/.local/share/nemo/actions/convert_to_webp.nemo_action
This will open the nano text editor and create a new temp file called convert_to_webp.nemo_action. We’ll then go ahead and paste the following text in which tells Linux what we want the menu-item to do –
[Nemo Action]
Name=Convert to .webp
Comment=Convert selected image(s) to WebP format
Exec=sh -c 'for f in %F; do out="${f%.*}.webp"; cwebp "$f" -o "$out"; done'
Selection=any
Extensions=jpg;jpeg;png;gif;bmp;tiff;tif;svg;heic;avif
Quote=double
Press CTRL + X and then enter Y to save the file.
How to Use
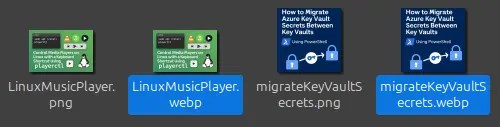
You can now select one or multiple supported files in the File Explorer and should see a “Convert to .webp” option as shown below –
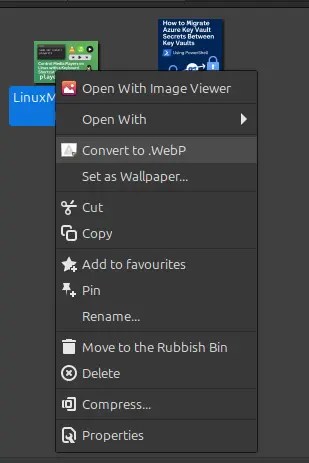
Selecting this option will start processing the images, converting them to .webp format at 80% quality, which for my test images reduced the size from 3.1MB down to just 100.2kB, a roughly 96% space saving.


Leave a comment