
Although static IP’s are fairly cheap these days, they don’t come as standard on home networks, which leaves us needing a solution for dynamically mapping a hostname to our ever-changing home IP.
One potential solution would be to use one of the many online providers that can provide DDNS such as DuckDNS or no-ip, however an alternative approach that you can manage yourself is to simply have a DNS record which points to your home networks’ public IP and have a local service update that record so that when your home networks public IP changes, so does the public record.
In this article I’ll cover configuring Azure DNS and a local service running on a Linux server to update the DNS record automatically.
Hopefully that’s enough pretense to write an article on this, really I just want to run a suite of home services including Minecraft and figured it would be fun to have my home server manage the DNS side of things.
Prerequisites
- An Azure DNS Zone set up (eg.
yourdomain.com) - A DNS record (A or CNAME) that you want to update dynamically (eg.
home.yourdomain.com) - An Azure service principal with permission to update the DNS zone
- A script or DDNS client to update Azure DNS when your public IP changes
Create an Azure DNS Record
For the purposes of this article we’ll make use of Azure DNS. I’ll assume you’ve already set up DNS for a domain which you control, if not though there are plenty of articles online covering how to do so.
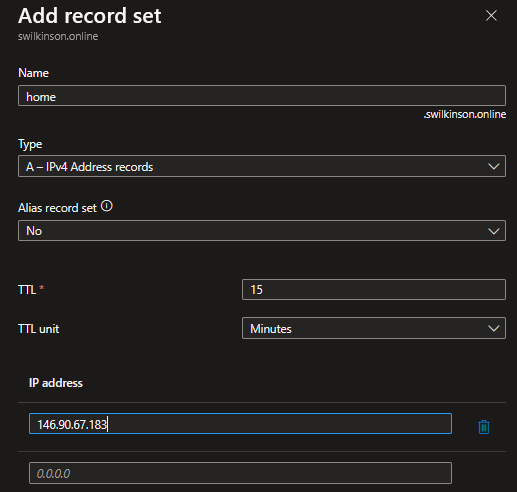
- Add a new A or CNAME DNS record as shown below, ideally set it to something other than your actual IP so that when you first run the script it updates the record and we can confirm it’s working as expected –
Create an Azure Service Principal for Authentication
Next we’ll create a Service Principal that’ll be used to automatically manage this DNS record.
Create a Service Principal
Run this in Azure Cloud Shell or your local terminal with az CLI installed, ensuring that you’re in the correct Subscription. Update the name property and the scope as required to point to your DNS Zone.
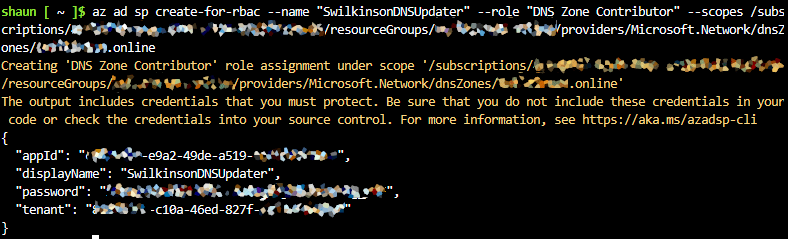
az ad sp create-for-rbac --name "AzureDDNSUpdater" --role "DNS Zone Contributor" --scopes /subscriptions/<subscription-id>/resourceGroups/<resource-group>/providers/Microsoft.Network/dnsZones/<yourdomain.com>
Once the command finishes, it will output the new appId, the given displayName, the password and the tenant. Ensure you take a note of the password as we’ll need that later.
Write a Script to Update the DNS Record
Next we’ll write a basic Python script which will retrieve our networks public IP address and then updates the Azure DNS record. We’ll run this as a service on the Linux machine.
Python Script
You’ll need the requests, azure-identity, and azure-mgmt-dns modules installed.
Then create a new file called dnsUpdater.py or whatever you’d like to call it and save it to a memorable location. In my case I created a new directory called Scripts in the root of my home directory then created a new file called dnsUpdater.py using nano.
Paste the script below in, ensuring you set all the Azure credentials variables to your own details.
import requests
from azure.identity import ClientSecretCredential
from azure.mgmt.dns import DnsManagementClient
# Azure credentials
TENANT_ID = "your-tenant-id"
CLIENT_ID = "your-app-id"
CLIENT_SECRET = "your-password"
SUBSCRIPTION_ID = "your-subscription-id"
RESOURCE_GROUP = "your-resource-group"
DNS_ZONE = "yourdomain.com"
RECORD_NAME = "home"
TTL = 300 # 5 minutes
# Get current public IP
response = requests.get("https://api64.ipify.org?format=json")
public_ip = response.json()["ip"]
# Authenticate with Azure
credentials = ClientSecretCredential(TENANT_ID, CLIENT_ID, CLIENT_SECRET)
dns_client = DnsManagementClient(credentials, SUBSCRIPTION_ID)
# Get current DNS record
record_set = dns_client.record_sets.get(RESOURCE_GROUP, DNS_ZONE, RECORD_NAME, "A")
# Check if update is needed
if record_set.a_records and record_set.a_records[0].ipv4_address == public_ip:
print("No update needed.")
else:
print(f"Updating DNS: {RECORD_NAME}.{DNS_ZONE} -> {public_ip}")
dns_client.record_sets.create_or_update(
RESOURCE_GROUP,
DNS_ZONE,
RECORD_NAME,
"A",
{
"ttl": TTL,
"a_records": [{"ipv4_address": public_ip}]
}
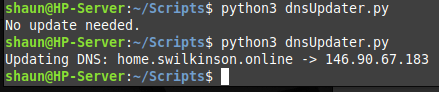
)Once you’ve created the file. Run it using the python or python3 command. Eg. python 3 ./dnsUpdater.py.
You should see one of the two results shown below, confirming whether the DNS was updated and what to, or the fact that no update was needed.-
Automate the Script Execution
Now that we know the script is working, the next step is to make it run every 5 minutes so that it’s auto-maintaining. We’ll do this using crontab which is a tool designed for scheduled tasks.
Open a terminal and type the following to use crontab –
crontab -eThen follow the prompts to select your default editor if you’ve not used crontab before then enter the following on a new line in the crontab file. Ensure you update the path to your own python file. –
*/5 * * * * /usr/bin/python3 /home/*username*/Scripts/dnsUpdater.py > /tmp/dnsUpdater.log 2>&1
The line above will schedule CronTab to run the python script every 5 minutes and will output any logs to the tmp directory in a log file called dnsUpdater, we’ll check that after the next 5 minute interval to ensure it’s running and that we see the expected output.
Run the code below to open the dnsUpdater logs, replacing the directory with your own if you changed it. You can also use any text editor, I’ve only used nano as an example.
nano /tmp/dnsUpdater.log
All going well you should see something similar to the text below or that no update was needed.

Now so long as your machine is turned on, the public DNS record should always contain your homes public IP (or will within 5 mintues or changing).
Next you’ll need to allow given traffic through your firewall etc, however I’ll leave that to somebody else to explain as the exact steps will differ depending on your provider and hardware.
Conclusion
There are plenty of free services such as DuckDNS which allows you to do similar, but there’s a certain amount of fun in running these minor things yourself.
If you would like to do something similar to this yourself then I would recommend looking into methods of securely storing credentials as it’s always poor practice to store them in plaintext such as in my example, but I didn’t want to unnecessarily complicate a fun little project.
I’d love any feedback of just a shoutout if you enjoyed the article, be sure to comment below and share the article if you enjoyed it!


Leave a comment