
If you’re new to Azure and want to deploy your very own website, you’re in the right place! Azure Static Web Apps is a fantastic way for beginners to get started with Azure cloud deployment. It’s simple, efficient, and the free plan is perfect for personal projects or learning purposes so it’ll cost you exactly nothing to follow along with this post.
I’ll walk you through the process of deploying a website using Azure Static Web Apps, all the way from setting up a GitHub repository to seeing your website live on the internet. We’ll use an existing sample “Rock Paper Scissors” project to make things easy and to sidestep any issues with peoples differing levels of abilities in regards to coding so no need to worry if you’re not a coding wizz.
- Why Azure Static Web Apps?
- Step-by-Step Guide to Deploying Your Website
- Remove the Created Resources
- Conclusion
Why Azure Static Web Apps?
Azure Static Web Apps is a service designed to host static sites that are fast and secure. Whether you’re building with Angular, React, Vue, or even just plain HTML and CSS, Azure Static Web Apps provides an easy way to get your project online.
But before we get started, what exactly is a static site?
A static site is a website that consists of fixed content—HTML, CSS, and JavaScript files—served directly to the user’s browser, without requiring server-side processing. Unlike dynamic sites, which generate content on the fly using databases and server-side code, static sites deliver the same content to every visitor. This makes them faster, more secure, easier to host, and importantly for us, cheap!
Why Use the Free Plan?
For personal projects or just testing things out, the free plan on Azure Static Web Apps is more than enough. Here’s what it covers:
- Free Custom Domains: Connect up to 2 custom domains without additional costs.
- Staging Environments: Create up to 3 staging environments free.
- SSL Certificates: Automatic HTTPS for secure communication.
- Global Content Distribution: Your site is hosted across multiple locations worldwide, ensuring fast loading times.
- GitHub Integration: Automated CI/CD pipeline is set up with GitHub Actions, allowing seamless updates every time you push code to your repository.
- Basic Authentication: Simple, built-in authentication for your site, including social logins with GitHub, Twitter, and Azure AD.
Why It’s Valuable
The free plan is an excellent choice for students, hobbyists, or developers who want to learn and experiment without incurring costs. It allows you to focus on building and deploying without worrying about the infrastructure details which facilitates very quickly gettong your idea available to the public.
Step-by-Step Guide to Deploying Your Website
Let’s get hands-on and deploy a sample Angular application using Azure Static Web Apps. We’ll use this sample project from GitHub.
Set Up a GitHub Repository Using Visual Studio Code
To get started, you’ll need to set up your development environment. We’ll use Visual Studio Code (VS Code) since it’s the go-to standard nowadays:
- Install Visual Studio Code:
- If you haven’t installed VS Code yet, download and install it from the official website.
- Install Git:
- If Git is not installed on your machine, download and install it from here.
- Fork the Sample Repository:
- Go to ShaunWilkinson/RockPaperScissors in your web browser.
- Click the Fork button in the top-right corner to create a copy of this repository under your own GitHub account.
- Clone the Repository in Visual Studio Code:
- Open Visual Studio Code.
- Open the Command Palette (Ctrl+Shift+P or Cmd+Shift+P on macOS).
- Type
Git: Cloneand select it. - Paste the URL of your forked repository from GitHub:
- Example –
https://github.com/YOUR-GITHUB-USERNAME/RockPaperScissors.git
- Example –
- Choose a folder on your local machine where you want to clone the repository.
- Once cloned, VS Code will prompt you to open the cloned repository. Click Open.
You should now see that Visual Studio Code looks like the image below, showing the full project repository –

At this point you can tweak the project in any way you’d like, a good start may be modifying the index.html file and simply changing the text within the <title> tags to show something like “My first app” rather than “Rock | Paper | Scissors”.
If you make any changes, be sure to Commit the changes back to GitHub, which will automatically build your changes and publish them on the website we’ll see shortly.
Create a New Static Web App in Azure
Now, let’s move over to the Azure portal:
- Log in to the Azure Portal:
- If you don’t have an Azure account, create one here. New users get $200 in free credits to use within the first 30 days.
- Create a Static Web App:
- In the Azure Portal, click on the Create a resource button.
- Search for “Static Web App” and select it in the list of services.
- Click Create.
- Configure Your Static Web App:
- Subscription: Choose your subscription.
- Resource Group: Create a new resource group or choose an existing one.
- Name: Enter a name for your app (e.g.,
RockPaperScissors). - Plan Type: Leave on Free to avoid any costs.
- Deployment Details:
- Source: Choose “GitHub”.
- Organization: Select your GitHub username.
- Repository: Choose the forked repository (
RockPaperScissors). - Branch: Select the
mainbranch.
- Build and Deploy Settings:
- Framework Preset: Choose “Custom”.
- App Location:
/(root directory). - Output Location: . (dot).
- Review and Create:
- Review all the settings, which should look like the image below, then click Create. This will kick off the deployment process.

Verify Your Deployment
After a few minutes, your app will be live!
- Go to Your Static Web App:
- Once the deployment has completed (which can take a minute or two), click Go to resource on the deployment page.
- Under View your application, you should see a Status, this may show ‘waiting for deployment’ or similar but should change to ‘Ready’ within a minute or two which indicates it’s built your website correctly from GitHub.
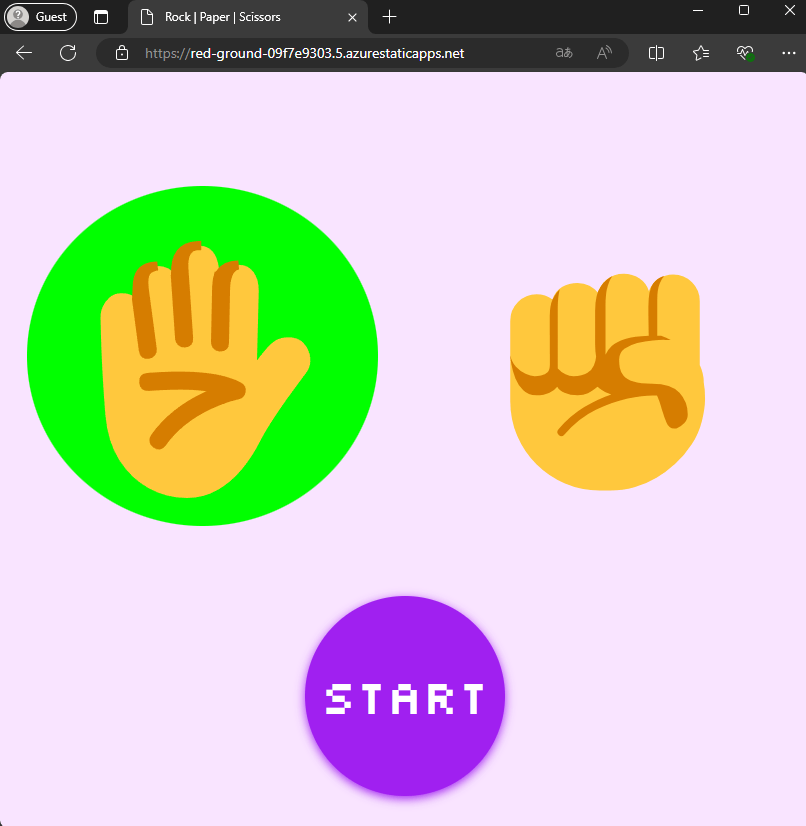
- Visit Your Live Website:
- You’ll see a URL like
https://<your-app-name>.azurestaticapps.net. Click this link to visit your live site! - Clicking the Start button starts a very basic AI vs AI game of Rock, Paper, Scissors.
- You’ll see a URL like
Make Changes and Redeploy
Now that your website is live, you can easily make changes to your app and redeploy it using Visual Studio Code. Here’s how:
- Edit Code Locally:
- In Visual Studio Code, open the files you want to edit. For example, you can modify the
index.htmlfile to modify the title or you can modify the style.css file to change how the game looks. - Make your desired changes to the HTML, CSS, or JavaScript files.
- In Visual Studio Code, open the files you want to edit. For example, you can modify the
- Preview Your Changes Locally:
- Before deploying, it’s a good idea to test your changes locally. Since this is a basic page this is as simple as going to the Run and Debug tab in Visual Studio Code and clicking Run and Debug.
- Select Web App (Chrome) or similar depending on your installed browsers to view your changes in a local browser.
- Commit and Push Changes to GitHub:
- After verifying your changes, it’s time to commit them. In Visual Studio Code:
- Open the Source Control view by clicking the Source Control icon in the Activity Bar on the side of VS Code.
- You’ll see a list of the files you’ve modified. Stage the changes by clicking the + icon next to each file or by right-clicking Changes and then selecting Stage all changes.
- Enter a commit message in the text box (e.g., “
Updated title to "Rock | Paper | Scissors!“). - Click the ✔️ Commit button to commit your changes.
- Next, push the changes to GitHub by clicking on the Sync Changes button at the top of the Source Control view.
- After verifying your changes, it’s time to commit them. In Visual Studio Code:
- Automatic Deployment:
- Once you push your changes to the
mainbranch on GitHub, Azure Static Web Apps will automatically detect the update, rebuild the project, and redeploy the updated site. - After a few minutes, your changes will be live on your website. You can refresh the site in your browser to see the updates.
- Once you push your changes to the
Remove the Created Resources
If you don’t plan to continue using the site, it’s best practice to remove it. This ensures that you don’t accidently waste resources and potentially build up costs associated with the resources.
If you created a new Resource Group to host the Static Web App then navigate to the Resource Group and click Delete resource group in the action bar, otherwise select Delete in the Static Web App view, then select Yes.
The resource will be deleted after a few minutes.

Conclusion
Deploying your first website with Azure Static Web Apps is a great way to start learning about cloud computing and web hosting. The simplicity of the service, coupled with the free plan, makes it an attractive choice for beginners.
By following the steps in this guide, you now have a fully functioning website live on the internet, and you’re ready to dive deeper into web development and Azure’s rich ecosystem.
Happy coding! 🚀
If you’d like further information on static websites in Azure, be sure to checkout the Learn materials here – Static website hosting in Azure Storage


Leave a comment